
Hello again.
In this post, we are going to be making roads for wargaming using caulk and paint, as well as making some fields. I called it a tutorial but it's more of a 'here's what I did and how it came out.' Hopefully a fun post, and probably will get long winded. let's find out shall we?
We're on the Road to Nowhere (if that reminded you of a song from They Might Be Giants, then you and I are on the same frequency brother!)
This is a project I've been meaning to do for awhile; making some roads for my 15/18mm ACW games (or just for 15mm wargaming in general). And with several ACW games planned in the near future (hooray!) I decided to get to it already.
Bonus content: I'll also be making a few fields. Mainly, I'll be making The Wheat Field for the scenario Caldwell Clears the Wheat Field. you can read a previous AAR HERE. In it I mention that I wished the field was just a little bigger and more colorful. Since I'm running this scenario again in about 2 weeks at Midsummer Conquest, now seems like a good time to do that.
Now I could of just bought roads, and I was tempted to. I have some excellent roads from Wargamer's Terrain that I got in 4" width for my 28mm wargames. everytime I use them people ask me where I got then, but 4" wide is too big for 15mm. However the roads do come in 2" wide sections as well. but like many people I only have SO much hobby money, and cash saved here can be spend there. Also, I like to make terrain and try new things; and I was going to need a LOT of roads eventually; so if this process works it'll give me nearly unlimited roads.
There are several good tutorials online, so hopefully this post will take it's place among them. I can recommend Red Beards Youtube channel as being a good resource and I stole one of his techniques (more on that later).
This whole process is really just an extension of the techniques I used to make my own wargame mats, seen HERE.
step 5) squeeze into a bucket about 3/4 a tube of caulk. The add in paint, coffee, and fine ballast and stir stir stir stir.
I wish I could tell you an exact formula but there isn't one. You want it to have the consistency of a milk shake. I added a good amount of coffee and ballast so that I could see it.

step 6) pour the caulk. IMPORTANT: I have found that a thin layer of caulk is better than a thick one. A thick layer will crack as it gets moved about while a thin layer remains more flexible. so thick enough to cover the weave of the drop cloth and that's all you need.

Take the bucket and do a quick pour down the length of the road, and then use your hands to spread it out. You want to go over the lines by a little (why will be clear later). Sometimes I used my hand to ladle out some mixture to where it was too thin. I did both motions of smearing it out wider and down the length.

turns out I has some extra caulk/paint mixture so I made some more roads and a half section just by scooping out a handle full and smearing it down the drop cloth. So while I only drew 7 roads I ended up making 9.5.

for the field, you're gonna do the same thing, except in the shape of the field obviously, plus one additional step: while the cualk/paint mixture is still wet dump a whole lot of flock over it. just shake it out over the caulk and maybe press down here and there to make sure the flock really gets into the paint. PROTIP: I have found that 'turf' works better than just static grass. so at least mix both.
I wanted the Wheat Field (it gets capitalized because it's that important) to be a really bright yellow to make it really pop on the table, so I used 'Fall Yellow Course Turf.' Like I said, you want to be sprinkling out the flock while the caulk is still wet so have the flock ready to go after you pour the caulk. You need to be quick, but don't need to hurry if that makes sense.
step 7) let DRY. let dry FOR A LONG TIME. The longer you let it dry, the better. If you touch the caulk and it's cold to your skin, it's not dry. You will have less issues with curling if its completely dry before you cut out the roads. I let this dry overnight and into late morning and honestly it still could of used more time. But I rushed it a little bit because I got impatient and I feared another series of interruptions. I also wanted to get the family car back in the garage before it got 100 degrees outside and it got boiling hot in the car.
optional step) ruts: You could take a fork or something and when the caulk is about half dry make little furrows and ruts in the roads. I didn't do this because I thought my fingers did a good enough job but they seemed to have mostly disappeared as it dried.

step 8) dry brush the road as you see fit to bring out the textures. I gave a layer of lighter brown and one of white. My only advice would be to do a super duper dry brush.

for the fields, brush off the excess flock that didn't end up sticking to the mat. alternatively you could give it a good shake and send the flock flying off everywhere.


step 9) cut out the roads and fields. Any pair of good scissors will do the job. Cut the road out just before the point that the caulk gets too thin / splatters.
step 10) lay out the roads and see how much they curl. Might be a little, might be a lot. I do believe I cut my roads out before they were completely dry, so as some parts continued to dry and contract the edges began to curl up.

Optional step: add flock the edges to blend in the roads to the table. I didn't do this because I didn't think of it honestly. If I were to do it all again, I would add flock the same way I did to the fields, just sprinkle it on as the caulk the dried. alternatively, you could just do it after dry brushing by using watered down glue. For the time being, I'm gonna leave the roads bare and see how I like them.
So if my math is right. 9 sections each of about 2.5 feet is 22 feet of road. I kinda wanted to see how much that would actually be on a wargame table, so I put together a 5x6 table. I also threw down my wargame grass mat just so see how the roads looked on top of it. I think I produced a decent amount of roads for a first effort. later on I will trim these to various lengths for more variety.
you'll notice I didn't make any curves, just all straight pieces. There's no hidden meaning to that, it's just when looking at scenario map almost all the roads I see are straight, just bend at shallow angles, or are crossroads.
And since I already had the mat down, and the roads, and most of my terrain is also kept in the garage, and I wanted to take some pretty pictures for the blog, I started to lay out some more ACW terrain and the fields to see how it call came together...


Now I could of just bought roads, and I was tempted to. I have some excellent roads from Wargamer's Terrain that I got in 4" width for my 28mm wargames. everytime I use them people ask me where I got then, but 4" wide is too big for 15mm. However the roads do come in 2" wide sections as well. but like many people I only have SO much hobby money, and cash saved here can be spend there. Also, I like to make terrain and try new things; and I was going to need a LOT of roads eventually; so if this process works it'll give me nearly unlimited roads.
There are several good tutorials online, so hopefully this post will take it's place among them. I can recommend Red Beards Youtube channel as being a good resource and I stole one of his techniques (more on that later).
This whole process is really just an extension of the techniques I used to make my own wargame mats, seen HERE.
DIY Wargaming Roads Tutorial
Let's get started:
Step 1: Find a place to work that can get a little messy. I chose my garage, which is embarrassingly cluttered, so try not to look too hard at the background of any of the pics. When you're done you're going to need to let it dry so it needs to be a place where the set up can stay at least overnight.
step 2: set up a table (i used a standard folding table that's 6x2.5) and put your drop cloth . canvas, or whatever over it. I used a painters drop cloth that I got from Home Depot. Next, secure the cloth to the table. I used a bunch of clamps, they can be seen under the table. I'm told that if you don't secure the cloth that the whole thing will shrink up into a ball as the caulk contracts as it dries. I have not tested that theory for myself. It also makes it easier to work with because it won't move.

step 3: Use a sharpie and sketch out the roads and fields. I wanted my roads to be about an 1.5" wide as my ACW bases are an inch wide. This is just for a rough guideline so you don't need to be too exact. I colored in the roads just so I could keep track of which sections were to be roads and which were just spaces.

For the Wheat Field, I wanted to make sure my terrain like fence and stone wall sections would fit along the borders. So with a, dare I say genius, idea I tool out some terrain and laid it out in the shape I wanted, and then drew the lines of the borders.
step 4) Get interrupted about 100 times by wife and kids and other chores that suddenly have to be done right that minute that it gets so late that you pack it all up and continue on some other night in the future. You can skip this step.
after all this, it's time to mix up the caulk, paint, and texture...

You'll need some buckets to mix stuff in, some paint stirs, caulk and caulk gun, latex gloves (small size for me because I have delicate surgeon hands), and some paint a suitable brown color for roads. I used latex house paint which can be pricey because I had some already, but I've seen other tutorials use craft acrylic paint. you'll also need some lighter brown and white paint for dry brushing later.
depending on how much you are making, you don't need a ton of stuff. to make everything in this post I ended up using 1 tube of caulk and maybe a quarter gallon of paint.

step 3: Use a sharpie and sketch out the roads and fields. I wanted my roads to be about an 1.5" wide as my ACW bases are an inch wide. This is just for a rough guideline so you don't need to be too exact. I colored in the roads just so I could keep track of which sections were to be roads and which were just spaces.

For the Wheat Field, I wanted to make sure my terrain like fence and stone wall sections would fit along the borders. So with a, dare I say genius, idea I tool out some terrain and laid it out in the shape I wanted, and then drew the lines of the borders.
step 4) Get interrupted about 100 times by wife and kids and other chores that suddenly have to be done right that minute that it gets so late that you pack it all up and continue on some other night in the future. You can skip this step.
after all this, it's time to mix up the caulk, paint, and texture...
Gather Thy Matierials

depending on how much you are making, you don't need a ton of stuff. to make everything in this post I ended up using 1 tube of caulk and maybe a quarter gallon of paint.
 |
| Here is a close up the caulk I used., Notice it says Acrylic (not silicone), paintable, and flexible. |
 |
| this is what I dumped into the caulk and paint to add texture. Coffee grounds are the unsung hero of basing material. |
 |
| lets get started... |
step 5) squeeze into a bucket about 3/4 a tube of caulk. The add in paint, coffee, and fine ballast and stir stir stir stir.
 |
| looks like something gross... |
I wish I could tell you an exact formula but there isn't one. You want it to have the consistency of a milk shake. I added a good amount of coffee and ballast so that I could see it.

step 6) pour the caulk. IMPORTANT: I have found that a thin layer of caulk is better than a thick one. A thick layer will crack as it gets moved about while a thin layer remains more flexible. so thick enough to cover the weave of the drop cloth and that's all you need.
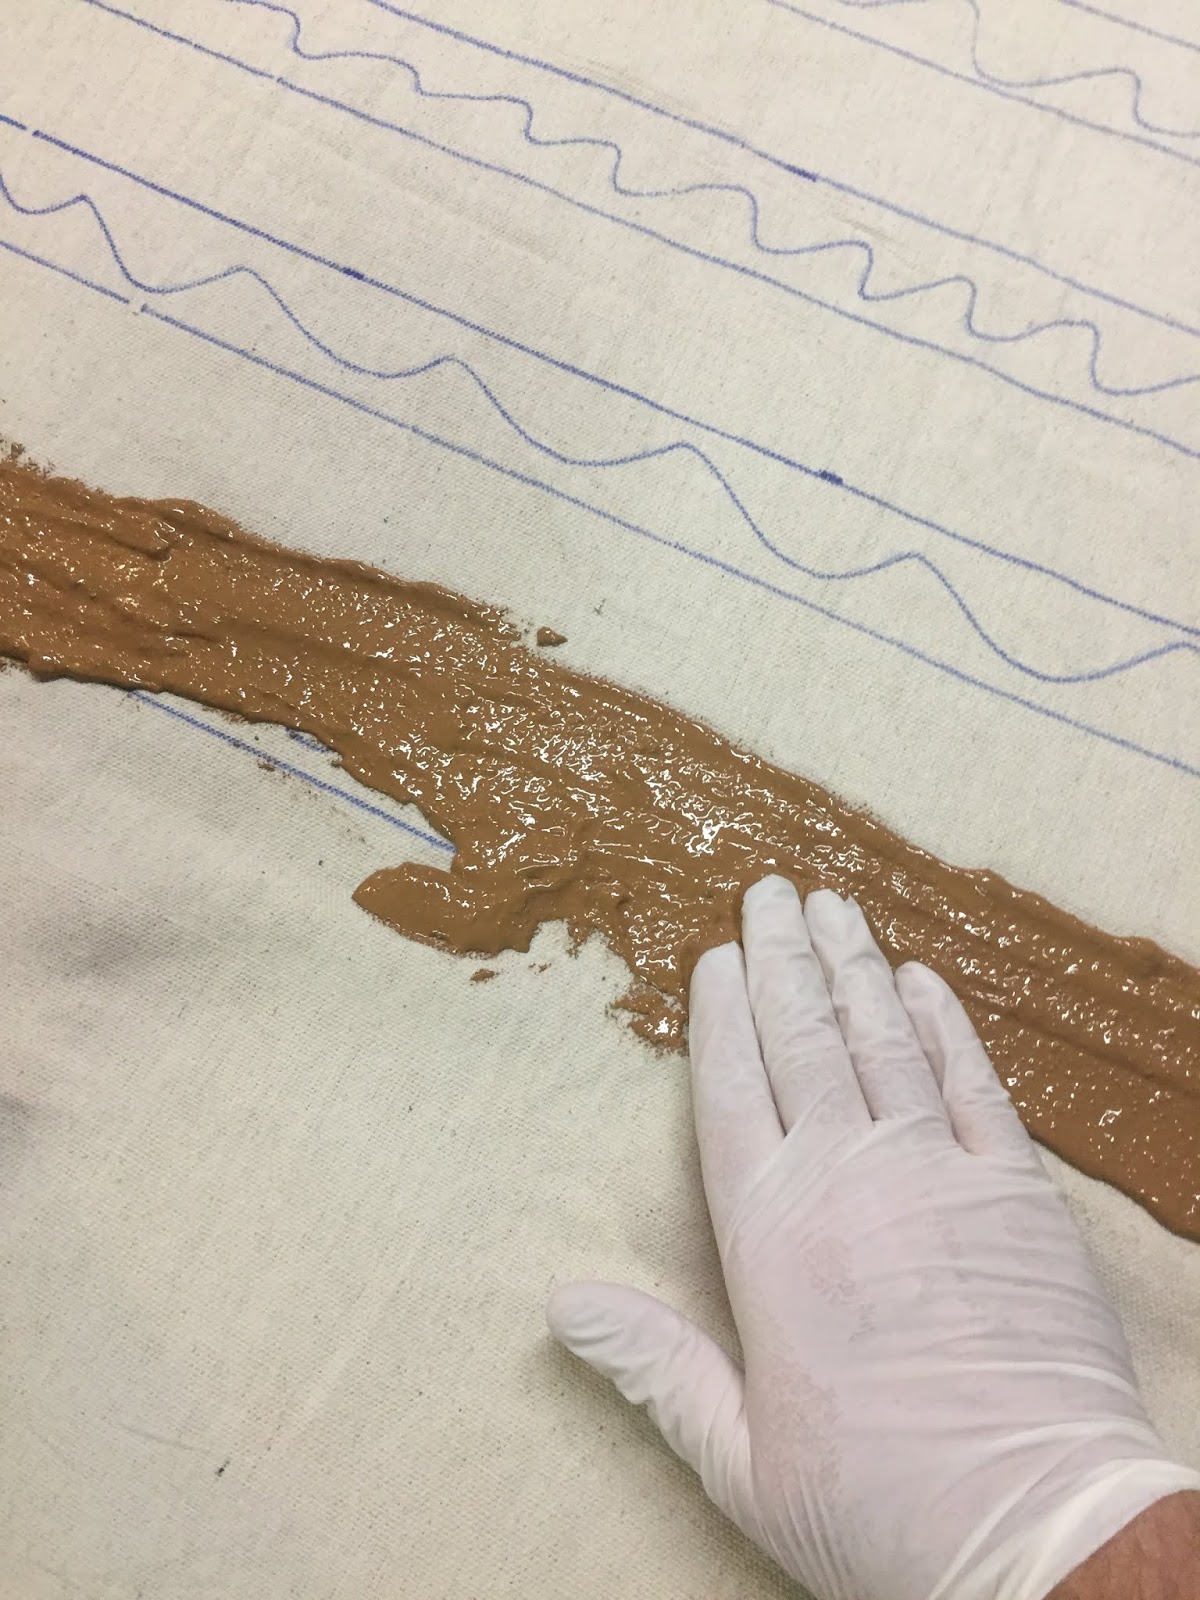
Take the bucket and do a quick pour down the length of the road, and then use your hands to spread it out. You want to go over the lines by a little (why will be clear later). Sometimes I used my hand to ladle out some mixture to where it was too thin. I did both motions of smearing it out wider and down the length.

turns out I has some extra caulk/paint mixture so I made some more roads and a half section just by scooping out a handle full and smearing it down the drop cloth. So while I only drew 7 roads I ended up making 9.5.

 |
| Close up of the roads... |
 |
| Now for the field... |
for the field, you're gonna do the same thing, except in the shape of the field obviously, plus one additional step: while the cualk/paint mixture is still wet dump a whole lot of flock over it. just shake it out over the caulk and maybe press down here and there to make sure the flock really gets into the paint. PROTIP: I have found that 'turf' works better than just static grass. so at least mix both.
 |
| yes this pic is sideways, just seeing if your paying attention |
I wanted the Wheat Field (it gets capitalized because it's that important) to be a really bright yellow to make it really pop on the table, so I used 'Fall Yellow Course Turf.' Like I said, you want to be sprinkling out the flock while the caulk is still wet so have the flock ready to go after you pour the caulk. You need to be quick, but don't need to hurry if that makes sense.
 |
| The table as everything dries. 9.5 road sections, The Wheat Field, and two other fields I haven't mentioned yet; extra credit. |
step 7) let DRY. let dry FOR A LONG TIME. The longer you let it dry, the better. If you touch the caulk and it's cold to your skin, it's not dry. You will have less issues with curling if its completely dry before you cut out the roads. I let this dry overnight and into late morning and honestly it still could of used more time. But I rushed it a little bit because I got impatient and I feared another series of interruptions. I also wanted to get the family car back in the garage before it got 100 degrees outside and it got boiling hot in the car.
optional step) ruts: You could take a fork or something and when the caulk is about half dry make little furrows and ruts in the roads. I didn't do this because I thought my fingers did a good enough job but they seemed to have mostly disappeared as it dried.
SO, After it's All Dry
almost done now. Just 123 more steps....

 |
| Dry roads with dry brush done. |

for the fields, brush off the excess flock that didn't end up sticking to the mat. alternatively you could give it a good shake and send the flock flying off everywhere.
 |
| If the flocking seems light in any areas then you can spray it with some watered down white glue and reapply the flock here and there. |

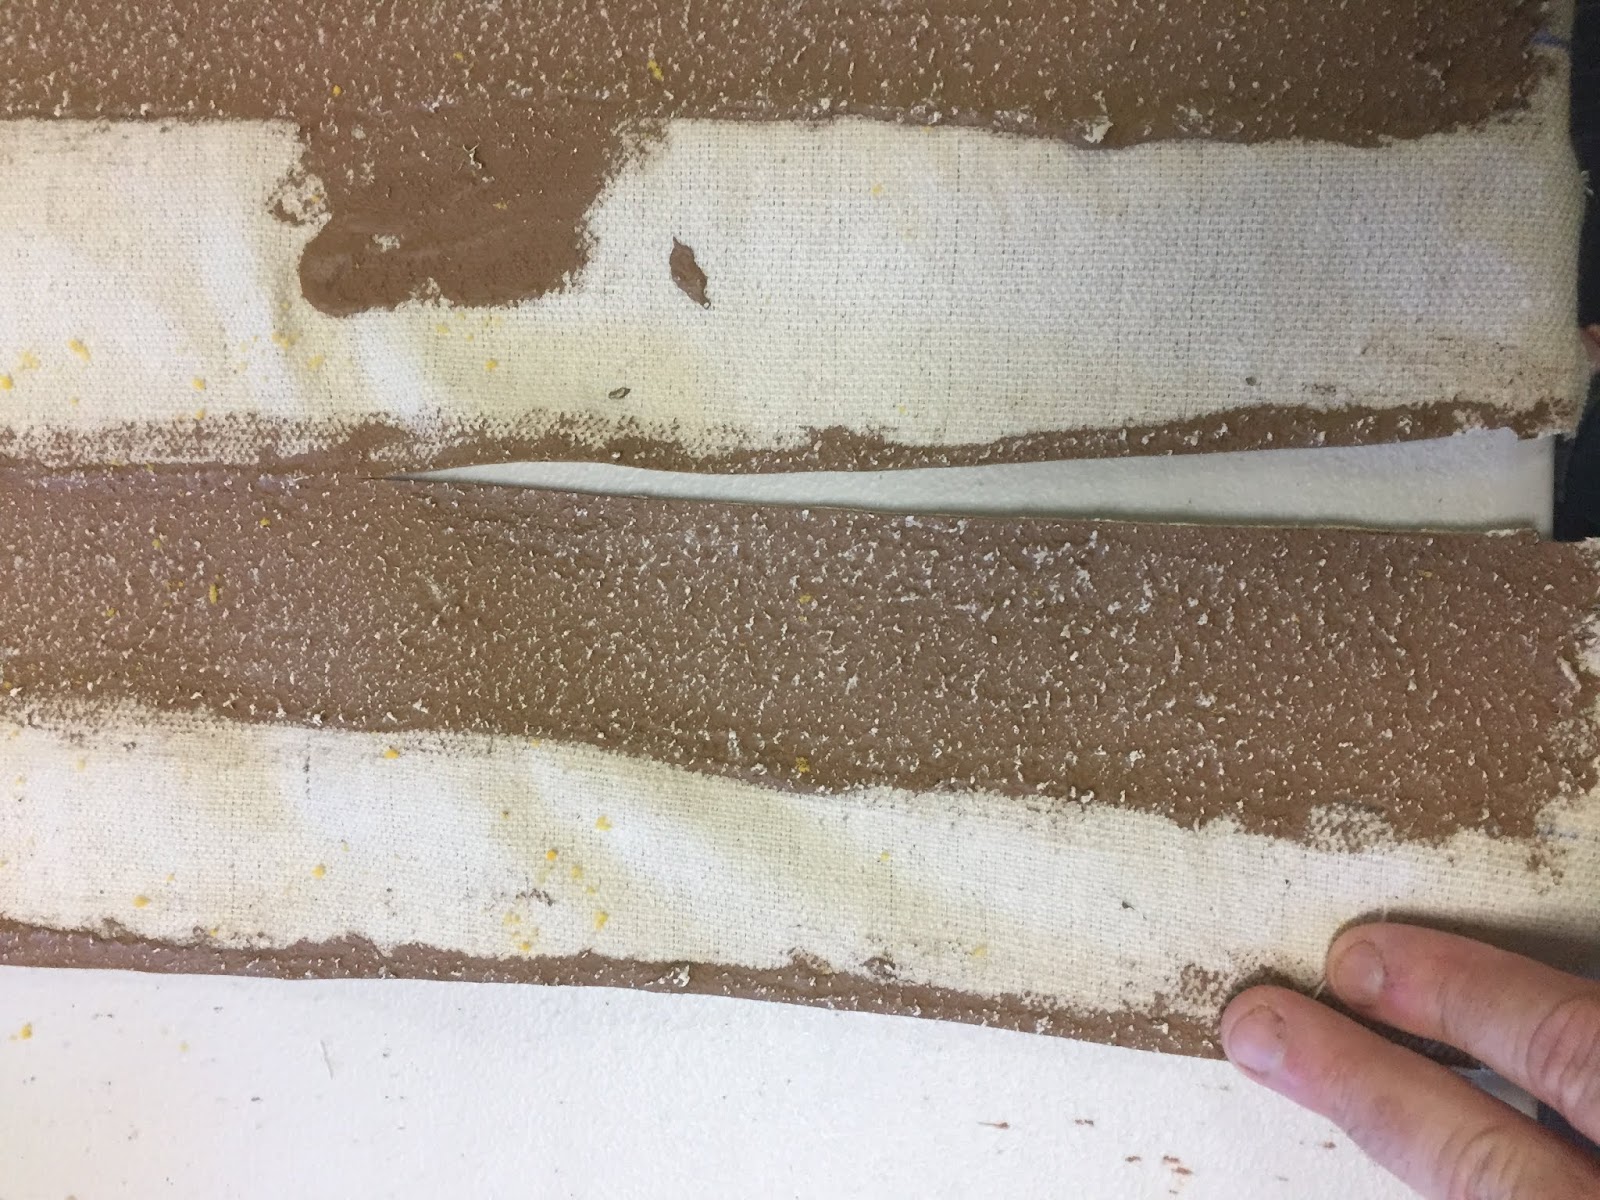

step 9) cut out the roads and fields. Any pair of good scissors will do the job. Cut the road out just before the point that the caulk gets too thin / splatters.
 |
| tadaa! |
 |
| gah! see how it curls at the edges.. probably could of used a few more hours of drying... |

 |
| duck tape solves everything! |
Step 11: Take a 2" roll of duck tape and run it along the bottoms of the roads. This will help hold the edges down. This trick I learned from Red Bread's Video road tutorial. (for some reason, my LINK button isn't working, so just search youtube for red beard wargaming roads)
After that, trim the roads again so that no tape is showing on the edges. And you are.... DONE
 |
| Flexible roads. |
Optional step: add flock the edges to blend in the roads to the table. I didn't do this because I didn't think of it honestly. If I were to do it all again, I would add flock the same way I did to the fields, just sprinkle it on as the caulk the dried. alternatively, you could just do it after dry brushing by using watered down glue. For the time being, I'm gonna leave the roads bare and see how I like them.
 |
| I made this much roads! |
So if my math is right. 9 sections each of about 2.5 feet is 22 feet of road. I kinda wanted to see how much that would actually be on a wargame table, so I put together a 5x6 table. I also threw down my wargame grass mat just so see how the roads looked on top of it. I think I produced a decent amount of roads for a first effort. later on I will trim these to various lengths for more variety.
you'll notice I didn't make any curves, just all straight pieces. There's no hidden meaning to that, it's just when looking at scenario map almost all the roads I see are straight, just bend at shallow angles, or are crossroads.
All done now, On the Road to somewhere.
And since I already had the mat down, and the roads, and most of my terrain is also kept in the garage, and I wanted to take some pretty pictures for the blog, I started to lay out some more ACW terrain and the fields to see how it call came together...
 |
| I'm liking how bright the wheat field is... |

 |
| Union Regiments on the March |

 |
| Not too shabby... |
I set up that much terrain and was reaching for more when I remembered some things:
it was late
it was hot (Sacramento's hot even at night...)
I was hungry
and my two living children were gonna get up really early....
so I stopped screwing around and cleaned it all up so I could go to bed. : )
These roads and fields will see good use in some upcoming ACW games. Hopefully my initial excitement will bear out.
I hope this will be helpful to anyone. I encourage you to give it try if you are so inclined.
Thanks for reading, and comments are always appreciated.
Nice work! Your yellow field really pops!
ReplyDeleteThanks! I think it’ll look good in my game coming up at a small local convention in about 2 weeks. 😀
DeleteNice work I have seen others using similar methods, I am slightly worried but he curling but I guess that depends on thickness etc...
ReplyDeleteThanks Matt! I really think it’s s matter of giving it enough time to throughly dry. I rushed it a little. Time will tell though. 😀
DeleteGood result. Nice tip on the Duck Tape backing, thanks.
ReplyDeleteThanks! It seems to eliminate most of the curling. Though credit to where credit is due it’s not my idea. All good ideas stolen from the internet. 😀
DeleteNice roads and helpful tutorial, probably better than my roads,bu b I can't see me replacing what I have,you had a lot of wastage on your sheet,was that deliberate?
ReplyDeleteBest Iain
Thanks Iain! Yes, there was a good amount of wasted drop cloth; a symptom of poor planning on my part. I could of put the fields closer together to maximize the useable space. For the roads, I was also thinking in hindsight that I could of made just one giant earth area and then just cut that into strips.
DeleteCongratulations on a very clear tutorial . The Duck Tape is a good tip and useful for other projects. Everything really ties in with your mat . What next , Rivers ?
ReplyDeleteThank you Bel. The tape is a good idea stolen from Red Beards video tutorial. I might try my hand at making rivers eventually. For now I’ll use my acetate sheets that are spray painted. You can see that process on my post Caldwell clears the wheat field AAR. 😀
DeleteNice work Stew, very bright wheat, sorry Wheat, field. Makes me look a bit lazy with my bought roads. Reminds me, must get my snake fence sorted.
ReplyDeleteTony.
Thanks Tony! I do think the Wheat Field came out pretty good. 😀
DeleteNo one is lazy. I sometimes just would rather make terrain than paint figures.
This comment has been removed by a blog administrator.
ReplyDeleteNice work! Roads are always useful.
ReplyDeleteAnd Sacramento is not that hot at night... you just have to wait until very late.
Thanks Las. Appreciate it.
ReplyDeleteAnd I’m usually asleep by the time it’s very late! 😀
Excellent tutorial. Some useful tips to ponder for my next terrain project.
ReplyDeleteThank you Lee. I’m pleased you liked it. I appreciate the comment and follow. Your blog is also excellent.
Delete