Herein is my guide for using Hail Caesar for Dark Ages battles, focusing on Vikings versus Saxons. Thugs versus Saints. Just in time for the 2nd edition to come out and make it all invalid (maybe, I actually here it's like 95% the same) (yes I ordered a copy).
but first...
Unexpected Hiatus
I took about 3 months off from blogging. I'm sure I was missed by 0-6 people. In the past, when the blog has gone silent it's been due to the birth of children; and this time is no different. Please welcome child #5 into the world NOOOOOOOO (wakes up in cold sweat). That was a fever nightmare brought on by too much absinthe and not enough greasy food. There are no new children.
Nah, the real reason is I just got busy, blogging became a chore, and I'm intrinsically lazy. Thanks to those that emailed your concern just to make sure I wasn't dead in a ditch somewhere. It was nothing dramatic, because I have a boring life, just lack of time with the usual culprits; family, work, and holidays.
You didn't really miss my stupid attempts at hilarious blog posts and relevant comments did you?
You did?
That's nice; I missed you too.
Plus I did this strange thing where I painted miniatures and played games and did NOT take pictures of to post online later. Felt weird, but also liberating.
I did get a fun shout out from Jay over on
Jays Wargaming Madness because we attended the same convention. Now I am famous.
To make up for my absence; I have this super long post that will be of use to only a few.
To the Dark Ages!
I love battles in the Dark Ages and I hope you to do. This stuff will focus on the time that the Great Heathen Army was knocking it's way around the British Isle. I've have tried MANY rule sets for this time period and Hail Caesar is the best fit (so far...). Ask me in the comments if you wanna know about other rule sets that have FAILED and feel free to suggest one for Dark Ages battles because I am on the look out; because Hail Caesar is Good but not Great and can be dropped for something younger, hotter, and more kinky. Like your first wife.
Overall HC does a good job of having lines of battle smash into each other and push/shove/grind it out until one side breaks. And you must like that sort of battle because here you are...
The other aspect of Dark Ages combat that HC does well is the concept that the better armed and armored troops would be in the front of the shieldwall and the poor shlups with a secondhand shield and crooked spear would be in the back. You can use the Combined Units rule in the main rule book (as they do in the Dark ages battle report) but I think the normal support rules are just fine; with the way supporting units add dice to the combat and hits bleed back into supports after the lead unit is shaken.
HC is best described as a tool kit rule set and begs to be tinkered with; in fact tinkering is encouraged. What follows now are some of my observations and tweaks, then some army lists, and then some scenarios. Here we go:
Set the Dials
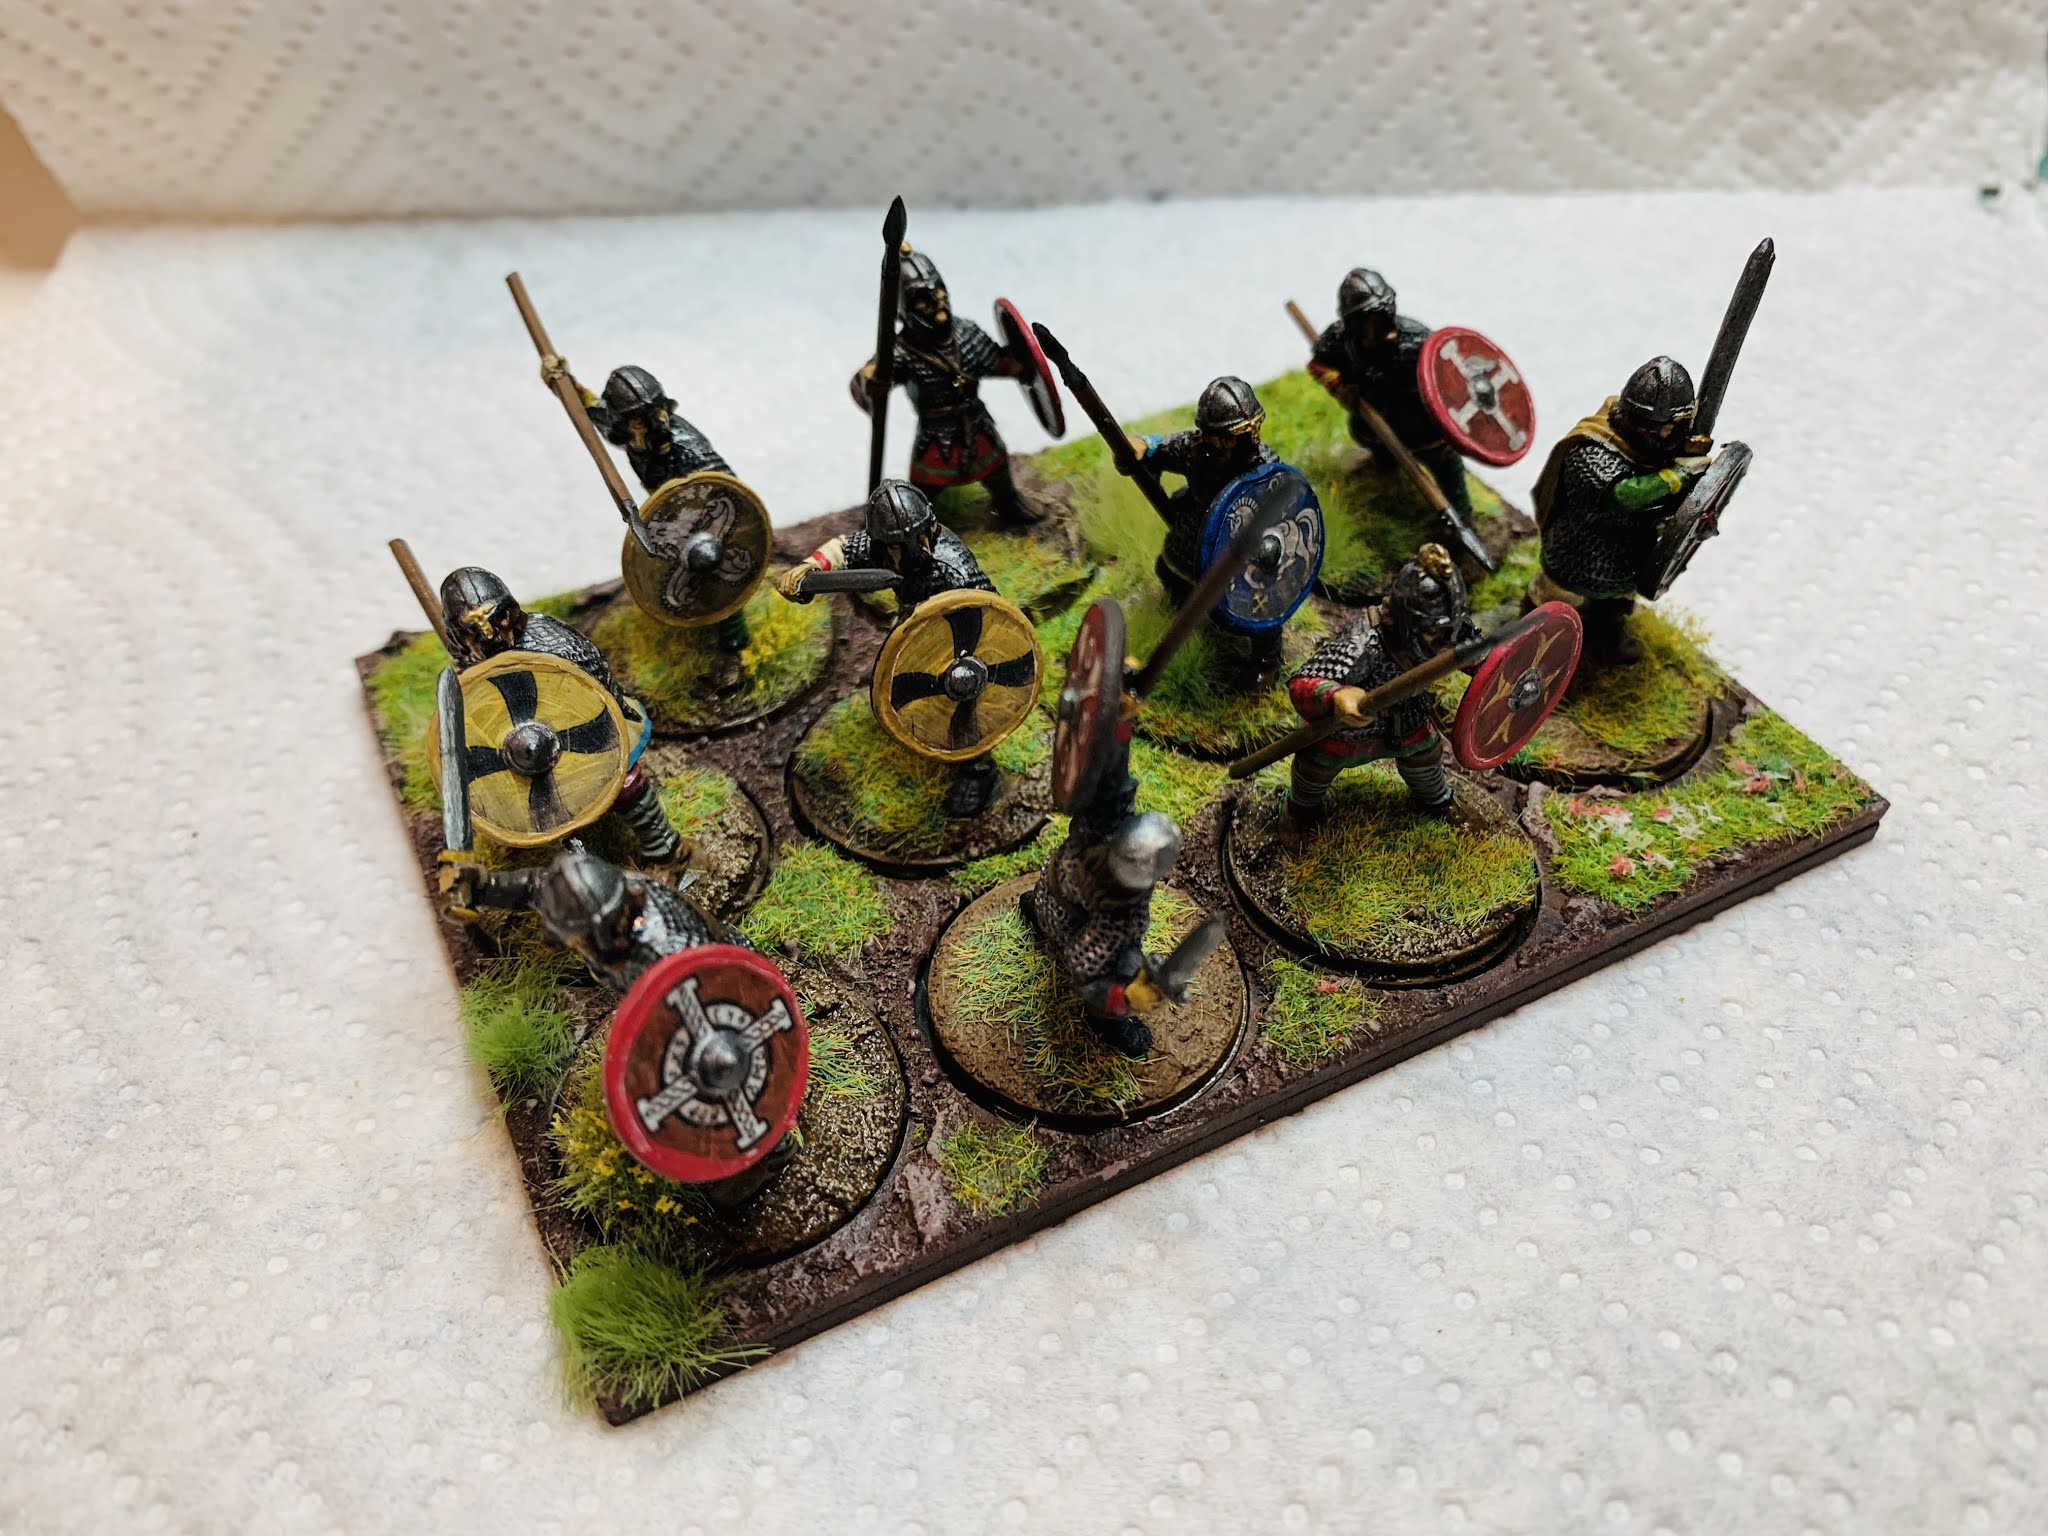
UNITS: HC has some dials to set when it comes to unit and table sizes being a generic set stating that a standard unit is any size you want it to be. I make the standard unit 1 base with 10 figures on it that measures about 4.5" by 3.5", that looks like this:
From Charlie foxtrot; 10- man loose order trays, I call these Big Battle Bases but it's just a fancy movement tray
Having a unit be 1 base is super convenient for working out fights and other things in the rules, plus it looks cool. It does mean that a unit can't be displayed in a square or column formation by rearranging the bases to form a square or a column, but who cares? You'll never need square (and it's the dark ages! They hardly knew what a square was) and units are in column so rarely and for so short a time that it's easy to handwave away.
I also put a little label sticking out the back that identifies what the unit is; because one group of men with beards and spears looks like another. A black label with white writing tends to fade into the background unless you're looking for it.
TABLE SIZE: With my unit size as above a 6'x10' is the best. It'll kinda depend on how many units one is fielding but in HC the answer is always "a lot" and so you want some room on the flanks unless your gonna just line up troops on both sides and advance toward each other. Which is of course what all Dark Age battles kinda were; not deep strategic thinkers those Dark Ages people. I'll discuss this more in the scenario section.
LEADERS: A command of 8 works well in all cases. With 2 dice to add to the combat. Leaders always throw in their full combat dice (there's no half-assing it while in combat) so are hit on a 11+. If hit a leader rolls on this wounded table instead of the lame 4 up roll in the main rulebook. 1-2 DEAD, 3-5 WOUNDED (loose 1 attack, if reaches 0 attacks then is dead), 6 I'M FINE (nana-nana poop poop). This is more fun in general and fits better into any scenario that might need an affect on a leader. Usually loosing a leader in HC is not too terrible and the next turn they get a replacement leader with command 7 and 1 attack. I sometimes do the thing that if leader gets killed then every unit in the division needs a moral test from their favorite lord getting his head caved in. Since there's no moral phase in HC just have units take a break test at the end of the turn in which the leader is killed; from the hand to hand table if the unit is engaged in combat and from the ranged table if not. I don't always do this. I do often stipulate that if the king / general is killed then that side looses. In all my games, players have never not thrown their leaders into combat....
here are some optional leader characteristics:
Famous War leader Bad Ass: Has 3 attacks, gets wounded on a 10+, but may reroll the leader wounded chart. (this is for if you wanna include Utred or Beobrand in your forces)
Brilliant or Mad?: -1 to all rolls for orders but will blunder on a 10+. (this one is kinda crazy, it basically means the leader will either have a successful order OR a blunder.)
There are probably some characteristics from Black Powder 2 that would fit nicely into HC. I dunno, I've never played Black Powder.
UNIT COMBAT STAT: Units in HC have a Clash and a Sustained value and while I like that idea overall it's cumbersome to explain and in 95% of the cases these values are the SAME anyway. Probably 98% if just talking infantry and the Dark Ages is mostly infantry (don't check my math). To streamline this I just combine the values into a COMBAT stat as in "roll this many dice in combat" and only mention the Clash/sustained concept in units where the value is different. You will see this in the army lists below. If in the standard unit profile list from the rule book; if a unit has a Clash and Sustained value being different by 1; I'll make the combat stat whichever number seems to work better. It really only matters if the difference is large like 9 to 6 and/or in units that you want to emphasize the 'initially hit REAL HARD and then fade off' behavior." Hitting hard and fading away is probably how my wife would describe my sexual advances. I come on strong but get discouraged easily.
Having one combat stat efficiently plugs into use of the Shieldwall formation; arguably the only formation that you need, and is a nice segue into
SHIELDWALL: While ya don't need square or column formations, you WILL need the Shieldwall. As my units are one base I devised an extremely clever way to mark which units are in Shieldwall by placing a marker made of shields....
 |
| Fine, it's not that clever. |
The Shieldwall rules from the mediocre HC supplement called Shieldwall (go figure) are good but need some flushing out in my opinion. of course it's my opinion, it's a blog, it's ALL my opinion.
Here is the actual rule I use:
Takes 1 move to form a SW (unit stays stationary and is marked with SW marker). While in SW a unit only moves half which is 3". While in combat a unit subtracts 1 from it's combat stat (this is the only time a Stat is modified), and gets +1 to morale saves and +1 to break tests.
All units of heavy foot and medium foot can form shieldwalls (this is like 90% of an army).
It costs nothing to drop shieldwall, just make a normal move.
Remember that if a unit takes a break test and gets a "retreat" result (usually from ranged combat) it will make a move backward which in this case is 3". If a unit gets a 'give ground' result (from hand to hand) it still moves back 6" because give ground is always 6".
Units cannot form shieldwall once in combat (because you can't do a formation change in combat), so your either prepared or not! It's the Dark Ages so everyone is already in something of a Shieldwall, so I think of the shieldwall formation as like a 'super duper Shieldwall' where the men are being very careful and focused on keeping together with the shields overlapping.
If a unit in SW elects to take a 'sweeping advance' it will drop it's SW formation automatically as they are over excited with success.
DIVISIONS and HURT FEELINGS: Because of the way that Orders work in HC (basically skewed for All or Nothing) it's usually better that each player control at least 2 divisions; so that if a division fails it's first order and does nothing the player isn't just sitting on his or her hands the entire turn. But there are times when it's 1 player - 1 division and this is when I introduce the 'hurt feelings token.' Especially during a convention; When a player fails their first order (rolls a 9, 10, or 11) or when the general fails the order and the reroll I'll launch into a little spiel for all the players "man it sucks to come to a convention and fail activation rolls. In order to salve your hurt feelings I'm gonna give you this hurt feelings token (my tokens are just extra bases with texture / grass on them so they look like the table top). Now it's designed to look like the table so that you'll forget about it, but this token is good for a plus OR minus 1 to any die later in the game. Just hand me the token and change a die up or down one; so a 3 can become a 4 or a 2 depending on your needs. There now. Now you feel better.
Tokens are also available through bribes, especially alcoholic drinks."
This makes the player feel like his turn wasn't a complete waste, it becomes a fun time when others fail and bemoan outload how they have hurt feelings. Half the time players forget they even have the tokens in the first place, and the plus or minus 1 is really only good for an extra save /hit or making an order roll better.
Army Lists
Here are the army lists that I use in my Dark Ages games. It's nothing all that special; it's really just taking ordinary units and applying special rules to suit your tastes so one version is not better than the other. Though mine are the best. Presented as what the unit is called in BOLD, it's stat line, and then any special rules underneath. Let's begin with the villains:
VIKINGS:
These guys are the most bad assed unit in my games and I only give the Vikings 1 unit of them in the general's division.
The basic heavy infantry.
The basic medium infantry.
 |
| 2 units of Berserkers |
You gotta have berserkers in a Viking army; it's just fun. I use the medium warband stats. I use them 2 ways. The first is as a unit onto themselves like above. I'll expound a little more on Expected Losses:
If a Division is made of purely berserker units then when that division breaks it does NOT count as a broken div for the sake of army morale. This is to reflect that while Berserkers aren't exactly suicidal, they are in a rush to get to Valhalla and are reckless in combat because if they died in combat they really wouldn't mind. I like to have a small division of 2 berserker units and tell the Viking player to 'fire these guys at someone you don't like. No one minds if they die. They don't mind much either. It's like a missile filled with stinky men and axes."
If the 2 units are part of a larger division, then both have to be destroyed to count as 1 unit loss toward the division breaking. If you get the idea that I only have 2 berserker units then you are right. 2 are enough trust me.
If playing for victory points then berserker units count as half points.
The second method that I use Beserkers is as an attachment to some other unit (usually Hirdmen); just place a mean looking Berserker next to a unit to signify that the unit has an extra 3 attacks very first round of combat. Afterwards remove the figure and the unit fights as normal. If using points I suggest 3 points per Berserker buddy.
I have a bunch of miniatures that are obviously archers, obviously armored, and obviously Vikings (it's the beards). So I give them a unit of armored archers. This is a medium warband with long range. After reading the Strongbow series by Judson Roberts I like to include archers in Viking armies.
Open order Skirmishers.
And now for the heroes of our story:
SAXONS
These are supposed to be the dudes that are the leader's 'Oath Sworn Men' and will stand with their lord till the end (Battle of Maldon style). 'No Retreat' is just the Phalanx special rule renamed because phalanx sounds funny in a Dark Ages Army.
Standard heavy infantry.
Standard Medium Infantry. These are the same as Viking Bondi
Open Order skirmishers, but with spears this time.
Priests: A Saxon army can have number of priests accompanying it. Any good Lord would have some religious advisor hanging out. A priest can attach to a unit to give a spiritual boost; while attached the unit can reroll 1 miss in any "to hit" rolls and 1 fail in any morale saves (basically gives the unit 'Tough Fighters' and 'Stubborn' special rules). However an attached priest must test for being hit like a leader does, is hit on a 11+. There is no save, the priest just dies / is removed. When this happens I like to sing like a church choir and raise the miniature slowly upward. A priest is worth 3 points. Until he attaches to a unit have the priest just hang out behind the division or with the leader. Multiple priests can be assigned to a unit for multiple rerolls and each one must test to be killed during combat.
General Thoughts on Army lists:
So those are the basic army lists for the good guys and the bad guys. if doing a point based battle I have found that these lists kinda favor the Vikings (probably because they have more aggressive special rules that are better at winning fights and the way to win in HC is to win fights and make the other guy take as many break tests as possible). HC is also a bucket of dice game and with buckets of dice cra-za things can happen. But if super concerned about balance then give the Saxons some more troops or buff them with additional rules.
The profile for Viking Bondi and Saxon Ceorl are the same, the Saxon Thegns and Vikings Hirdman are basically the same but with the Hirdman getting tough fighters (and don't under estimate one reroll).
Skirmishers in open order: I put the version with bows in the Viking list and the version with spears in the Saxon list but really these are inter-changeable. For a standard sized skirmish unit I use 8 miniatures as that takes about as much space as the standard sized unit on the movement tray with 10 figures.
I use standard sized units in all the scenarios, as it's just easier to know that every unit has 6 stamina.
DARK AGES SCENARIOS
Here are some Dark Ages scenarios that I have used at conventions and club days. I think they are good scenarios but why wouldn't I? These are not actual historical scenarios but stuff I made up. And honestly we know so little about Dark Ages combat and history that we have to make most of it up anyway. Even well known battles like Hastings, Ashdown, and Maldon have little actual information about them. I think the key to a good Dark Ages scenario is to design it so that troops just don't line up and fight each other because that is expected and boring; but allow players to line up and fight each other because that is expected and exciting. I also think HC scenarios benefit from a turn or two of moving / shuffling before everyone get locked in with priority.
Now I don't claim to be any great graphic artist, so the maps are pretty basic. And of course these are all just suggestions and can and should be changed according to taste. One can also switch the sides pretty easily...
Key: Red units are Vikings,
Hc= Huscarls, H = Hirdmen, Bz = Berserkers, Ar = armored archers, B = bondi.
Blue units are Saxon.
Cm = Comitatus, T = Thegns, C = Ceorls,
In both armies: large circles equal leaders, bunch of smaller circles are open order skirmishers.
for simplicity; I'm gonna show each army deployed in 3 divisions. Remember that all tables are 6x10.
Scenario 1: Negotiations Break Down
Here the Vikings have landed their ships close to a Saxon Village only to find it defended. The leaders of both sides agree to meet in the middle of the field and discuss things; each bringing one unit. Vikings are asking / extorting for Danegeld and the Saxons are haggling. Something goes awry during the talks (use your imagination; maybe a Saxon says "Your Mama is SO fat that the Midgard Serpent encircles her!") and a fight commences.
Deployment: the Viking general and the unit of Huscarls are in the center of the table in contact with the Saxon general and a unit of Comitatus. the rest of the troops are farther back. The divisions of the generals should be about 2 or 3 feet away from their leader. (incurring the command penalty for distance).
Roll off, the higher side is the one that counts as charging the other in the middle of the table and that side has first turn. Players can decide to attach the general to the combat or not. It's a choice between getting more dice in combat or being able to send the general back to get closer to his troops. The units in the middle are not in shieldwall. The side that won the roll off does their turn normally. On the first turn of the side that lost the roll off, all units count as being 'Drilled' as they react with rage at the others side treachery at breaking the truce.
The Vikings can have 5 berserkers to attach to any unit they wish as the start of the game, EXCEPT the huscarls in the center (the Viking Jarl is not gonna bring a berserk to a negotiation). The Saxons can have 6 priests to attach to any units they want. The Saxon general can (and probably should) have a priest with him during the negotiation.
Victory: Break the other sides army.
This is basically just a pitched battle with a small variation of having the fight in the middle. it's good for new players as they'll get a walk through in the combat sequence right away. You could give some extra victory points for the Vikings if they get units into the village and he Saxons if the get to the longships, but it's more fun to just kill each other.
Scenario II: Surprise Attack
Here we have Athelstan, the grandson of Alfred the Great, reconquering the Danelaw. He has brought his army and has launched a surprise dawn attack against a Viking lord who has refused to bend the knee.
Deployment:
2 Saxon divisions start at the edge of the game table, around 9 inches in, with any skirmishers starting around the 12" mark. Saxons have the first turn. The third Saxon division can enter either behind the other 2 OR at the blue arrow on turn 2. I do a little one man drama and explain how a local farm worker who never liked those pagans but who was always a good Christian will lead them on secret path through the forest.
There are no Viking units on the table, but are all in the beds responding to the surprise attack. At the end of a Viking command phase each division rolls a die, and that is the number of units from that division that are ready and can deploy to the Xs on the map (about 6" from the village edge). However units must be deployed from least armored first to most armored last (as it take more time for men with chain mail to get them on and such). So basically each division must deploy units in this order: Skirmishers, Berserkers, Bondi, and then Hirdmen/Huscarls.
Since this roll happens at the END of the command phase, it means that the first Viking turn is just spent rolling to see who shows up. On the second turn any units that arrived last time can be given orders as usual and when that is all finished then roll to see which new units deploy.
Victory: For the vikings to win they have to break the Saxon army. it's the only way.
For the Saxons to win they have to break the Viking army OR if you have suitable building to act as a giant target for the Saxons to burn, say like the Great Hall from 4ground that's like 2 feet long, 1.5 feet wide, and 1 foot tall (I have one naturally), then they can win that way. A unit must be in contact and spend 2 moves to burn the hall. This can be done over multiple turns.
This is a fun scenario but it does have a lot of randomness. If the Saxons roll really well they can can be on the Vikings really fast before they are ready, but then Vikings units keep showing up to the fight. But if they move slow...
Even if the Vikings get great rolls for units showing up, they have the problem that it's ass backwards; with the units you want in the front of the shield wall (the best armored ones) in the rear. it can take mutiple orders to move things into position and remember that units that move through each other have to test for disorder. I usually have around 8-9 units in a Viking div (some skirmish, 4 bondi and 4 hird) so it takes around 3 turns to get everyone out.
Alternatively, two of Viking divisions are as I jsut described but the player in the center controls two divisions (so the total force is 4 divisions); one is the general's div with Skirmish, 3 bondi, 1 armored archer, 2 hirdmen, and 1 huscarls and the other div is simply 2 berserker units. The berserker div. is usually ready on the first turn (it's a 2+ roll) and on the second turn can just be launched at the Saxons to stall them...by dyeing but taking as many Saxons with them as they can.
The Saxons get 6 priests to attach as they see fit.
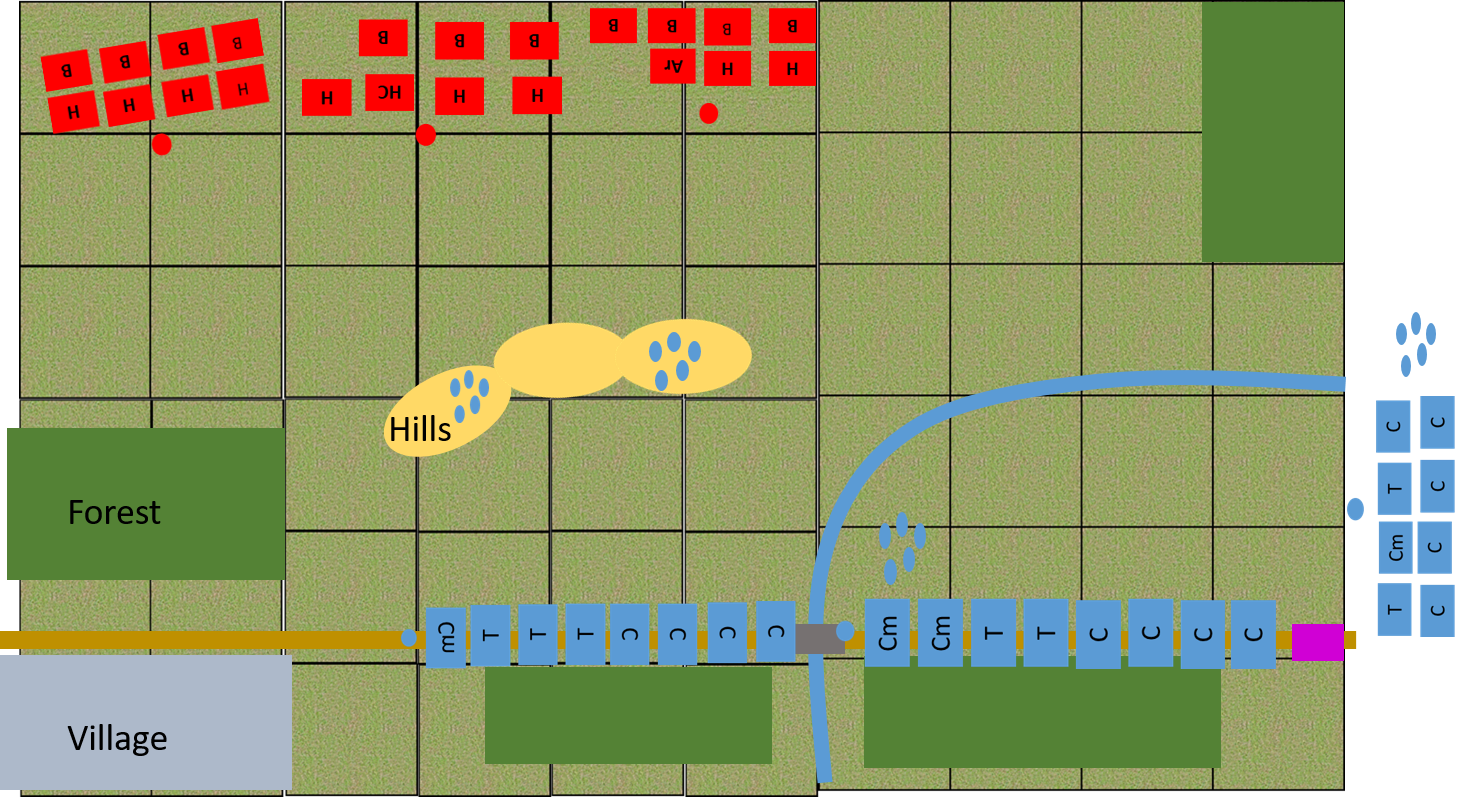
Scenario III: The Escort
Here we have a rather large Saxon escort for some VIP (in purple above). maybe it's a noble lady? maybe it's a noble's mistress? I sue some priests with an ale wagon. The Saxons sent some skirmishers up to the ridge to scout (solid security minded thinking that) and OH NOES! Vikings. bent on kidnap and ransom. Told ya they were thugs.
Deployment: The VIP starts on one edge of the table on the road. Two Saxons divisions are lined up on the road in front in a string. The third Saxon div is off the table and can enter on turn 2. The Vikings start on the table scrunched into the first 2/3rds of the table.
The stream is a liner obstacle and takes 1 move to cross. Units can charge across the stream but will lose the +1 charging bonus.
The VIP will take it's own orders test like it's a div of 1. All movement must be on the road. The VIP can move through other units testing for disorder like usual. A move is 6". If a blunder is rolled then it moves backward the required number of moves. The VIP will NOT move closer to a Viking unit than the closest friendly unit. Saxons get the first turn; all units on the table count as 'drilled' for the first turn. Told ya you didn't need columns.
Vikings get to use berserkers as attachments, 9 of them. the Saxons get 6 priests.
Victory: Vikings win by breaking the Saxon army BEFORE the VIP gets off the table via the road or by kidnapping the VIP. To kidnap the VIP a Viking unit must charge the VIP to capture it, and then escort it off the Viking table edge (but really it the end of a turn if the VIP is more than 2 feet from a Saxon unit you can count it as kidnapped).
Saxons win by breaking the Viking army OR getting the VIP off the edge of the table.
The Saxons need to get themselves into some sort of shieldwall, and who can resist forming a shieldwall on a hill? Nobody. Shieldwalls like hills like college girls like sugary alcoholic drinks.
At Last...the End
Man, that was A- LOT of typing for probably not that much information. Hopefully there was something in there for someone. This post is meant to a resource for anyone, and more just showing how I do the dark ages so that you can do it better than me. If you like any of this feel free to use it, and improve upon it, and then get back to me so I can steal it, and together we each can polish each others....ideas. that almost sounded dirty.
This post also marks my (yet to be proven) TRIUMPHANT return to blogging in general. Let the fun begin again.