
As previously promised, this post will feature actual wargaming content...
I've finally completed the ruins I was making for Lord of the Rings. It was a fun project, but here at the end I feel like it was a lot of effort for a game I haven't played in over 5 years...
If you are so inclined, you can check out the previous posts on this project..
Part 1
Part 2
Part 3
When Only a Grey Dry Brush will do..
Blah blah blah- here are pretty pics!


Taddaaa! This thing was painted by priming it all black and really just dry brushing shades of greys all over it, but not 50 shades of gray; a dark, medium, and light, and then white. Here and there on rubble piles and such there is a brown wash. The ground around the ruin was painted with a grey-brown color and greys dry brushed on that, with the rubble picked out with the same process of the ruin walls. The top half of the tower and the statue and now glued into place as well.
It was a LOT of dry brushing. And there a few places that it was hard to get a brush onto, like the inside of windows and narrow hallways.
Overall, I think it came out looking pretty darn good. And honestly I am more than a little proud of it. This is the biggest terrain project that I have ever tried and the first time using a MDF base.
So How is that Whole Osigiliath game board coming then....
Long ago, when I was more into Lord of the Rings gaming, I had an idea that I was gonna do a whole game board based on the location of Osigiliath in Middle Earth. Because it sounded cool. This project has been going on for years now, and it's only the new release of the Lord of the Rings by GW that re-lit my interest in the lands of make believe after being dormant for awhile. I think that's one of the joys of this hobby, that a project can be put down and picked up again.
Wanting to see how this project as a whole was coming along, and to compare the old terrain pieces that I have over the years to the brand new super shiny my favorite terrain piece ever that I had just made; I pulled out and placed all the Osigiliath ruins on the kitchen table and then stood back and took a good look.
I then went crazy with taking pictures...


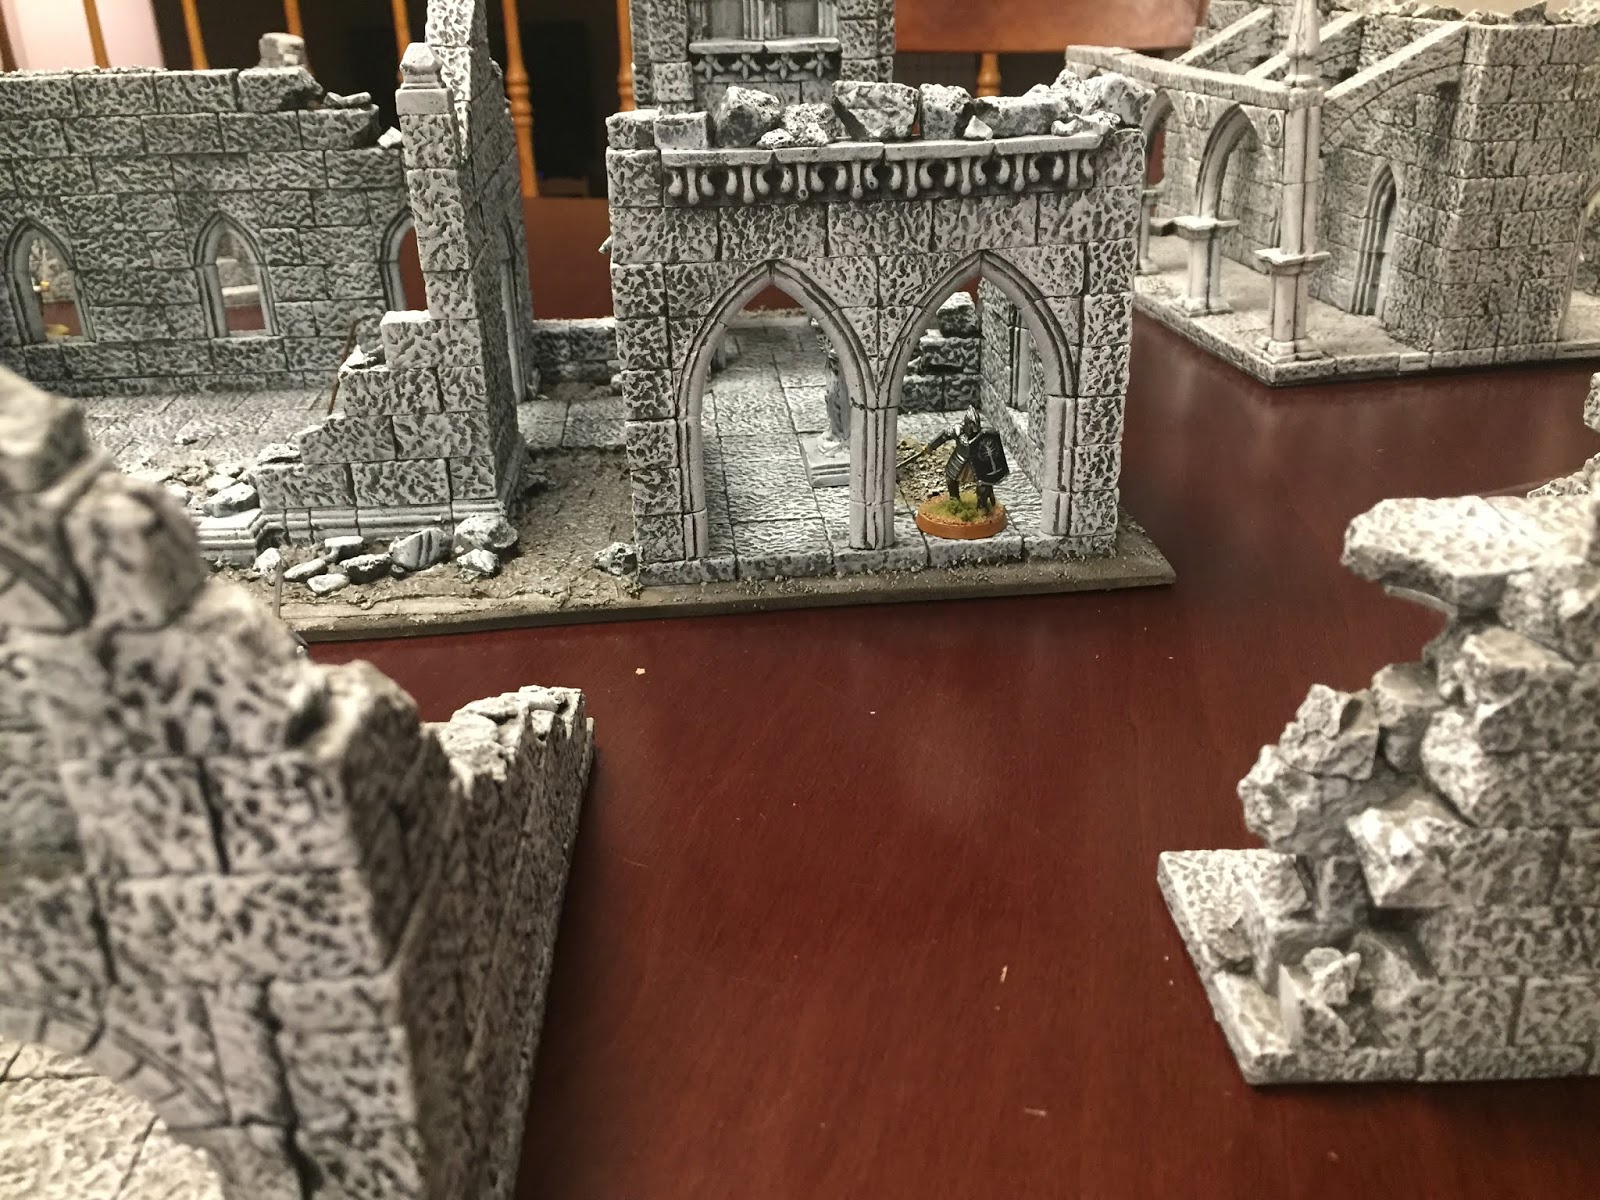 |
| right about here I remembered to add in some miniatures to show scale.... |


 |
| Is there anything more backwards than a guy in heavy armor armed with a bow? There's probably lots of examples in history where guys put on plate armor and then shot bows at each other.... or not. |
Overall I am very pleased with the effect, even on the brown wood table the terrain gives the impression of gray ruins. Which is what I want; when you watch the movies the scenes that take place in Osigiliath are primarily colored with greys, dark browns, and whites.
The kitchen table is just shy of 3x3, and Lord of the Rings is typically played on a 4x4 or a 4x6. So a few more terrain pieces will be needed just to cover the table. I think the addition of the MDF base REALLY works well and I'll likely do this from now on. It'll give more opportunities to play with power tools!
I'll also need a grayish table cover. I could make one of course, but I am tempted by some matts from Cigar Box like the Town Square or the Dungeon Floor that will just be easier to buy rather than make; but it's hard to make a purchase sight unseen. Also I don't know if I want to spend that much money for a very specific genre that might not be used that much.
I'd also want to rebase all my existing troops on gray brown rubble bases instead of the ubiquitous grass and shrubs. But that is close to madness! That's because I have megalomaniac dreams of taking this all to a wargame convention and finally being that cool guy with the really awesome table that everyone wants to take pictures of. Ahhhhh, simple dreams.
For now though on the Lord of the Rings front, my motivation is low. This last ruin was a fun project, it was something different, I got better at making some terrain and learned some skills, but man was it labor intensive. That's probably in the nature of the HA molds. And it took longer than I thought it would, though there were some family stuff and holidays that took away from hobby time. Conversely, at the same time I got to brain storming ideas for the next LoTR project. But for now, all this goes back into storage at the back of the garage. Maybe to chipped away at again and again over the years. I'll also need to think of some better storage ideas.
I think for LoTR, I first should probably play a game of it in order to renew my motivation.
Thanks for reading and comments!
The cathedral turned out marvelously! Great work and a fine focal piece for your LotRs gaming. Looks like a skilled craftsman turned out this piece.
ReplyDeleteThanks Jonathan! Though looks are certainly deceiving in this case. I’m more like an enthusiastic amateur with delusions of grandeur. 😀
DeleteWonderful! Although I am disappointed that you did not use the 50 shades joke in the title.
ReplyDeleteFor Osgiliath, it seems like a brown earthen mat would probably do the job, and then you just need a bunch of scatter terrain to make it work as a city.
Thanks Las! For the mat there is no rush, but no matter the color we have the same idea: flat mat with scatter terrain of different sizes. I also like the idea of making more ruins that have some elevation, just so it’s not all flat. 😀
DeleteRuins on hills and two story ruins would certainly go far to make the place more "real".
DeleteThat is exactly what I was thinking.
Delete😀
Nicely done! That one piece looks like it could double as Weathertop.
ReplyDeleteThanks Dan! There are a couple of HA molds that I think were clearly inspired by LoTR stuff: like that round tower. 😀
DeleteExcellent finish,it came out really well and all your pieces together look great, can't you have a game on them before they're packed away?
ReplyDeleteBest Iain
No LoTR on the schedule yet, and I can’t just leave them on the kitchen table. Probably wouldn’t survive meals with the kids. 😀
DeleteBut even while in storage they will be accessible for the future.
They look really good Stew, hope you get to use them in anger at some point soon.
ReplyDeleteThank you Tony! 😀
DeleteAwesome buildings Stew. Great stuff!
ReplyDeleteThanks! Appreciate it. 😀
DeleteI'm sure that if you were to put these components out on a table at a convention they would be "picture worthy" for sure--there is no doubt that you have "ruined it!" :)
ReplyDeleteThanks Ed! I think so too, but it’s not yet quite at the level to provoke the wargamer envy that my fragile self esteem requires. 😀
DeleteStill, it’s a nice collection that I am proud of.
The final presentation is superb, I rather lime the round building and the two large figures on the outside wall of the square building. I remember you being bothered about how to paint these, but your painting decisions have turn out bang on.
ReplyDeleteThanks Norm. When you look closely one can see the areas where I messed up with too heavy of a dry brush but I’m probably being over critical. The statues come from a German company whose name escapes me right now but it starts with a Z. Last time I was at a FLGS I picked up several but I used my last one on this project.
DeleteVery nice it all looks great together and should make for some entertaining battles across it.
ReplyDeleteThanks Simon. I appreciate it and that’s the plan, I like my skirmish games to have a lot of terrain. 😀
DeleteThe ruins turned out very nice indeed Stew. I love Hirsts Arts and have several molds. Just too busy building ships to use them much anymore.
ReplyDeleteThanks Vol and I hear you on that. Before this project it was years since I broke out the molds. Luckily the molds seem to last a long time when stored correctly.
DeleteLOTR is a project I’ve often considered. I was lucky enough to find two GW cases full of 200 well painted GW LOTR minis in a junk shop for AUS$100 (about what you’d pay just for the empty cases). There must have been a third case at one time as the collection is not complete, but the shop owner couldn’t recall if he’d sold it or simply didn’t know where it was (!!). One day I hope to fill the gaps, although I’m not sure I can pull off such great looking terrain as you have here. Lovely work.
ReplyDeleteThanks TP. That was indeed a lucky find you had there. Unfortunately the days of finding cheap LoTR figures is probably passed, now with GW showing some attention to it.
DeleteFantastic looking model Stew! I love the Hirst Arts molds but man does it take forever to get all the pieces you need to build anything - I had started a project sometime ago like this and just gave up, my hats off to you for completing it :)
ReplyDeleteThanks Ivor! You are correct that using HA molds is a bit labor intensive. This was a huge project for me and it took forever. One reason I kept at it was because it took up my whole hobby area so I had no room to work on anything else, so I had to finish it. 😀
DeleteSuperb painting and construction on a timeless piece of terrain Stew. I would think this could be used for other periods as well as LotR's.
ReplyDeleteCheers,
Pat.
Thank you very much Pat.
DeleteI think the ruins have a fantasy flare to them but will indeed work for other genres. Medieval castles and such like. 😀
Stew these ruins are just amazing. Its not just the modeling its the artists eye you've used in the designs. Great job!
ReplyDeleteThanks David. It did come together rather well in the end. All I need now are a few more...
Delete