
Kinda like Wandering Eyes, but for Miniature Games...
Let's wander off to the dark ages. I have a decent collection of Vikings, Saxons, and Normans that have sat around dormant for awhile. I've been very faithful to the ACW and AoS for the last year but lately I've been tempted to dabble back into the dark ages, kinda like when you run into an ex-girl friend that's been to the gym a lot.
Because of this sexiness from Warlord Games
Because of this sexiness from Warlord Games

Hail Caesar she says? I like Hail Caesar rules
Dark Age Sagas she says? I like the games set in the dark ages...
Volume 1? So more in the future...
Updated rules for the Dark ages, including a new rule for being in a shield wall she says? HELLO baby! I've missed you so much...
but then again...
While I love dark age skirmish games and dark age battles; I couldn't really find a ruleset that I really liked for mass battles. I tried a couple of different rule sets (War and Conquest, Age of Empires, Sword and Spear, and Hail Caesar), and all were decent games* but none of them really rang my bell completely as in 'now this is what I want.' But let's talk for about Hail Caesar for the moment.
Hail Caesar came the closest to what I wanted; but I don't love the command roll and I really didn't think it did a good job of modeling units in a formal shield wall. The command roll in HC (and for that matter Black Powder) can be lame because if you are controlling 1 division and fail your first roll, (basically need to roll 8 or less on 2d6, and there's no way to modify that roll), then you don't do anything for most of the turn which is BORING. The obvious fix is to have each player control at least 2 divisions, so that the odds of failing both command rolls on the first attempt are very low; ensuring that a player will most likely be able to move something. Sometimes I'm surprised that 'roll to activate' mechanics are still around, as nobody likes them. No one wants to roll dice and then do nothing. A better game mechanic I've seen is a 'roll for type of activation;' the better the roll the more options, the worse the less options or even moving in retreat, but at least retreating is doing something. Even if you have to move your units backwards it's better than rolling dice, cursing, then stating "well, my movement is over. you guys go ahead and do your moves while I wander away and get something to eat and maybe I'll be back in time for shooting."
The shield wall problem was more complex: there really wasn't a good mechanism to illustrate a bunch of men forming a compact shield wall to make them harder to kill. yeah you could use the 'close ranks' ability (-1 to hit, +1 to save) but after a few games of this I realized that ability actually SUCKED and you should never do it. EVER. It actually makes it more likely you will lose the combat, which in HC means you take the Break test, which means there's a chance to lose the unit. AND the way to win at HC is make the other guy take more break tests.
What HC is good at is putting on a good looking game with long battle lines smashing together and grinding it out with some excitement. It's also easy to pick up, doesn't take too long, and is easy to construct scenarios with. Overall I think it's a pretty decent generic rule set though.
The new book has a new shield wall rule, which sounds better than anything I could come up with. Which is the main point about buying expansions: I'm paying for someone to think for me.
*OK, fine, let's talk about the other rule sets:
War and Conquest was just a little too complicated and the I found the shooting to be WAY overpowered. In all the games I played my formed units in Shield wall formation would get shot to pieces by large groups of skirmishers, which in my mind should NOT happen; formed infantry should not be done in by skirmishers. Also I discovered that I didn't like building units from individual models and individual casualty removal. just too picky.
Sword and Spear has a lot of stuff I like except one big thing that bugs me: while you can move units as a group together, when it comes to charging into contact units have to move one at time, alternating with the other player. So instead of smashing your battle-line against his battle line, you dribble units in piecemeal which doesn't match my perception of dark age battles.
The next best thing is of course to buy something and/or build something. I shouldn't buy any miniatures because I have PLENTY lying around. So I'll likely buy the book (especially bc Warlord has free shipping right now due to the royal wedding). And for a small project I found 18 Norman Crossbow men that I had purchased from someone else oh-so-long-ago that needed rebasing. So that was that.
And while putting the guys away I took a moment to organize and inventory the collection of Normans so far. I grouped them by type and counted and got:
59 Infantry
24 Archers
31 Crossbows
16 Unarmored Knights
35 Armored Knights
2 leaders.
or roughly 60 infantry, 60 missile, and 60 cavalry. Just like I planned it.
Also my smallest Dark Age army.
I give you The Norman Army:
Fun fact about these Normans: I only painted maybe 4-8 of them. All others are bought from other gamers or paint service. That's right, this force is completely mercenary; just like the real Normans.
I fell victim to marketing strategy that sometimes gets to me: Making a generic rule set and an endless amount of supplements for that rule set; also succumbed to "new shiny syndrome" albeit in book form, of a genre I'm not doing anytime soon. But at least it's a continuation of a current wargaming period and not something just totally random. Therefore: partial success!
I did something different to break up the constant ACW and AoS, and increased my collection of completed figures; Therefore success!
Found something to blog about, maybe worth reading?
Maybe.
Partial success!
Dark Age Sagas she says? I like the games set in the dark ages...
Volume 1? So more in the future...
Updated rules for the Dark ages, including a new rule for being in a shield wall she says? HELLO baby! I've missed you so much...
but then again...
Dark Age rule Sets Quibbling
While I love dark age skirmish games and dark age battles; I couldn't really find a ruleset that I really liked for mass battles. I tried a couple of different rule sets (War and Conquest, Age of Empires, Sword and Spear, and Hail Caesar), and all were decent games* but none of them really rang my bell completely as in 'now this is what I want.' But let's talk for about Hail Caesar for the moment.
Hail Caesar came the closest to what I wanted; but I don't love the command roll and I really didn't think it did a good job of modeling units in a formal shield wall. The command roll in HC (and for that matter Black Powder) can be lame because if you are controlling 1 division and fail your first roll, (basically need to roll 8 or less on 2d6, and there's no way to modify that roll), then you don't do anything for most of the turn which is BORING. The obvious fix is to have each player control at least 2 divisions, so that the odds of failing both command rolls on the first attempt are very low; ensuring that a player will most likely be able to move something. Sometimes I'm surprised that 'roll to activate' mechanics are still around, as nobody likes them. No one wants to roll dice and then do nothing. A better game mechanic I've seen is a 'roll for type of activation;' the better the roll the more options, the worse the less options or even moving in retreat, but at least retreating is doing something. Even if you have to move your units backwards it's better than rolling dice, cursing, then stating "well, my movement is over. you guys go ahead and do your moves while I wander away and get something to eat and maybe I'll be back in time for shooting."
The shield wall problem was more complex: there really wasn't a good mechanism to illustrate a bunch of men forming a compact shield wall to make them harder to kill. yeah you could use the 'close ranks' ability (-1 to hit, +1 to save) but after a few games of this I realized that ability actually SUCKED and you should never do it. EVER. It actually makes it more likely you will lose the combat, which in HC means you take the Break test, which means there's a chance to lose the unit. AND the way to win at HC is make the other guy take more break tests.
What HC is good at is putting on a good looking game with long battle lines smashing together and grinding it out with some excitement. It's also easy to pick up, doesn't take too long, and is easy to construct scenarios with. Overall I think it's a pretty decent generic rule set though.
The new book has a new shield wall rule, which sounds better than anything I could come up with. Which is the main point about buying expansions: I'm paying for someone to think for me.
*OK, fine, let's talk about the other rule sets:
War and Conquest was just a little too complicated and the I found the shooting to be WAY overpowered. In all the games I played my formed units in Shield wall formation would get shot to pieces by large groups of skirmishers, which in my mind should NOT happen; formed infantry should not be done in by skirmishers. Also I discovered that I didn't like building units from individual models and individual casualty removal. just too picky.
Sword and Spear has a lot of stuff I like except one big thing that bugs me: while you can move units as a group together, when it comes to charging into contact units have to move one at time, alternating with the other player. So instead of smashing your battle-line against his battle line, you dribble units in piecemeal which doesn't match my perception of dark age battles.
So Like an Itch
It is funny to me how the dark ages genre kinda resurfaced in my brain, completely unbidden. I'm still focused on ACW (and have some serious hobby plans for the troops) but now all of a sudden I am seduced into thinking about dark age games and scenarios. The obvious way to scratch this itch is to play a game with my dark age miniatures. After all, I have all these painted miniatures and terrain for a reason. Of course my life is not cooperating and recent events are having me with little time to escape to play games. For the time being I'm one of those guys who builds and paints but won't get a game in anytime soon. I wonder how that will effect the blog; what do you do with a wargaming blog when you're not wargaming?The next best thing is of course to buy something and/or build something. I shouldn't buy any miniatures because I have PLENTY lying around. So I'll likely buy the book (especially bc Warlord has free shipping right now due to the royal wedding). And for a small project I found 18 Norman Crossbow men that I had purchased from someone else oh-so-long-ago that needed rebasing. So that was that.
 |
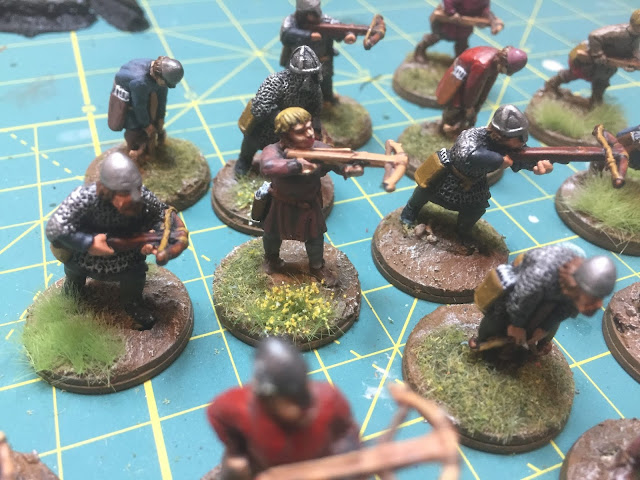
| These guys basically came on a 4 x 4 base that I destroyed awhile ago . It was a simple matter of just preparing and gluing them to the new 25mm rounds and then doing the ground textures |
 |
| Like so.. tadaa! |

And while putting the guys away I took a moment to organize and inventory the collection of Normans so far. I grouped them by type and counted and got:
59 Infantry
24 Archers
31 Crossbows
16 Unarmored Knights
35 Armored Knights
2 leaders.
or roughly 60 infantry, 60 missile, and 60 cavalry. Just like I planned it.
Also my smallest Dark Age army.
I give you The Norman Army:
 |
| Ariel shot of all the groups |
 |
| Norman Infantry |
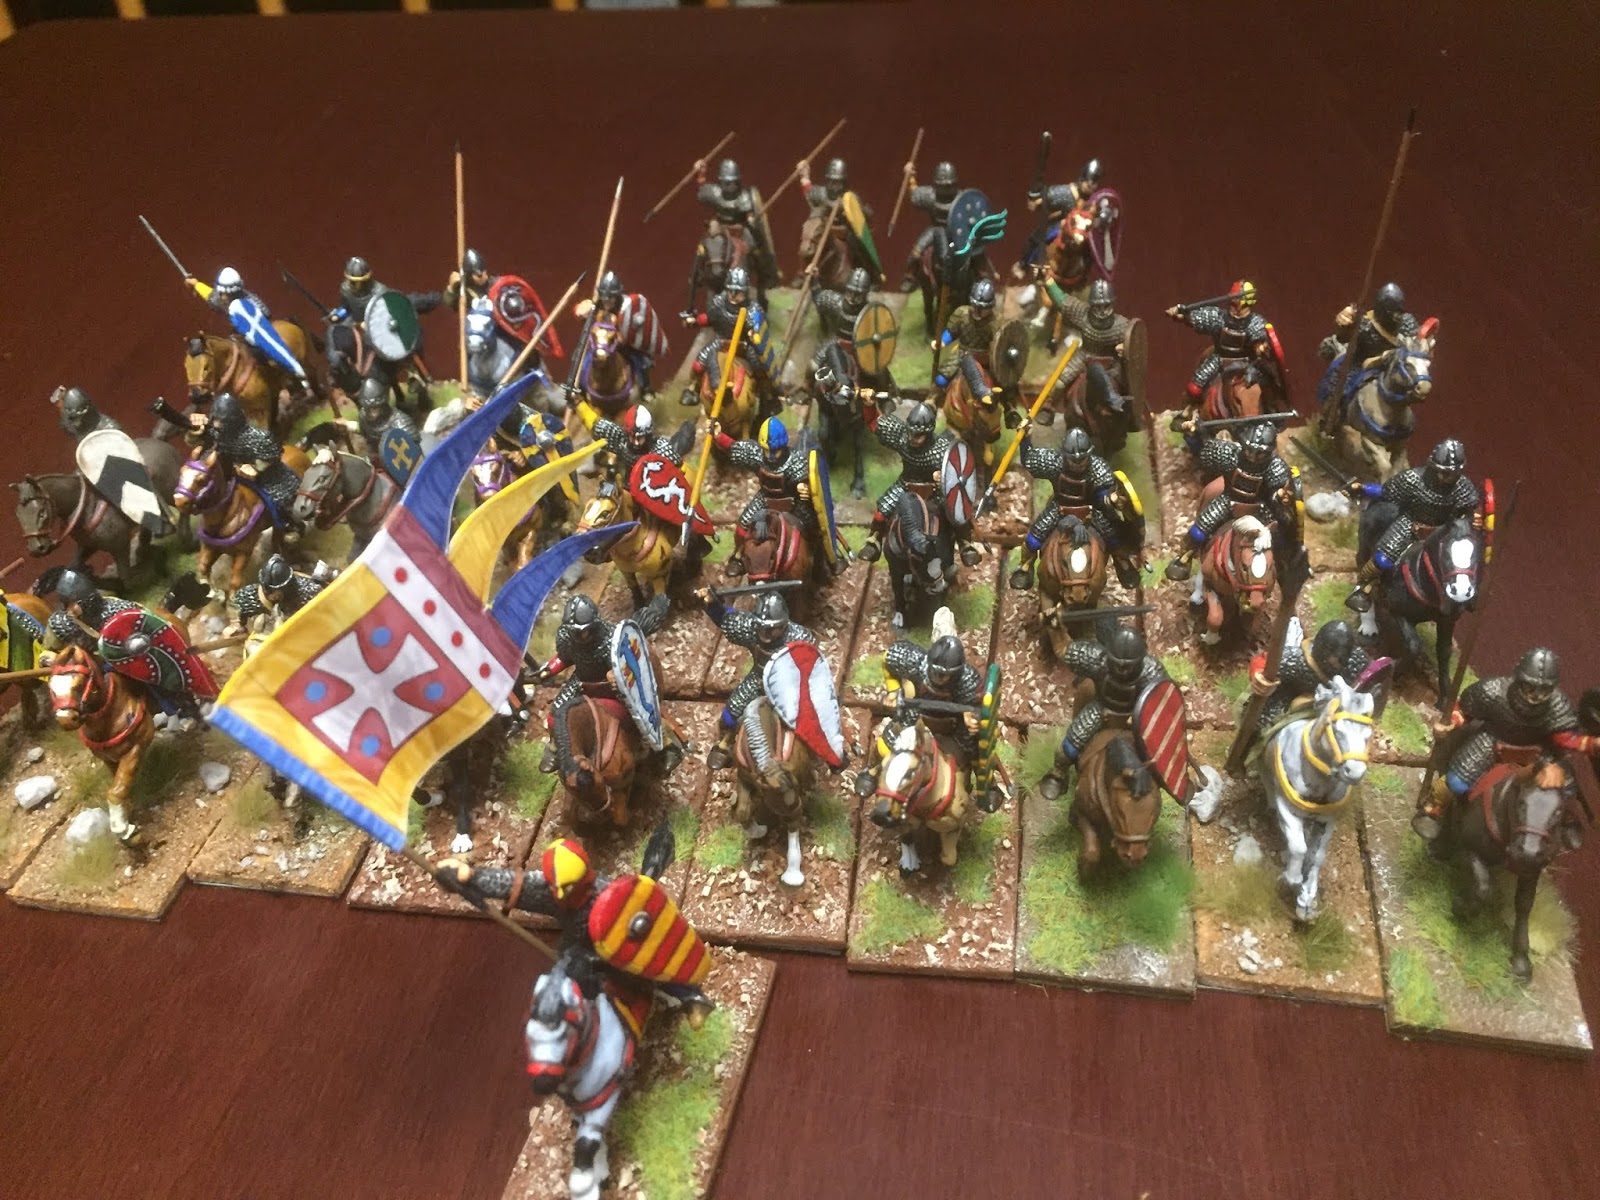 |
| Armored Knights |
 |
| Unarmored Knights |
 |
| Crossbows |
 |
| Archers! |
Fun fact about these Normans: I only painted maybe 4-8 of them. All others are bought from other gamers or paint service. That's right, this force is completely mercenary; just like the real Normans.
Successful Wargamer?
So what happened:I fell victim to marketing strategy that sometimes gets to me: Making a generic rule set and an endless amount of supplements for that rule set; also succumbed to "new shiny syndrome" albeit in book form, of a genre I'm not doing anytime soon. But at least it's a continuation of a current wargaming period and not something just totally random. Therefore: partial success!
I did something different to break up the constant ACW and AoS, and increased my collection of completed figures; Therefore success!
Found something to blog about, maybe worth reading?
Maybe.
Partial success!


