
YAY! The 'This Quar's War Trench Terrain Boards' are finally finished.
 |
| This is the image that germinated the whole project |
This post will be the exciting conclusion to the series and this project. This is a long post. If one wanted to make it longer, or if one is fool hardy or curious enough, one may read the previous installments:
Seems like a lot of parts. But go on, give it a read. See as I flounder around like a toddler in a swimming pool trying my best at terrain making.
Of course, the toddler in that simile is wearing floaties. I'm not a monster.
Bury the Lead
But before the big reveal... back to where we last left off. Feeling somewhat discouraged last time, Ed M. hit the nail perfectly on the head describing that there is a stage in the building / painting process that just looks more terrible than anything that came before it. That's where I was, and really hopeful that the next stage (this one) would make things right again.
First thing was a black wash for all the parts. I knew I was going to need a lot of black wash so instead of using my tiny bottle I went and got a giant one...
 |
| Just kidding. |
I actually don't use Washes all that much believe it or not so had no idea how much I would need. I decided to follow a recipe I found online to make your own.
 |
| Ingredients and the resulting bottle of Back wash. |
I used a bottle of drinking water. Poured out about half the water while singing a song about missing my homies, added a little bit of the flow aid, mixed it, filled up the remaining half with the matte medium, mixed it, and then added black ink till it was dark enough. Turns out, this was about 1000% more wash than I needed. Now I have Black wash forever.
The I used the black wash on all the wood and rock parts...
 |
| Before Wash |
 |
| After Wash |
 |
| Before Wash... |
 |
| After Wash |
I KNOW! Not a super huge difference. In truth, I think I took these pictures too soon because it tended to look better the more it dried. The wash DID do its job of making some shadows and tying all the elements across the boards tother in the same shade.
 |
| Little more of the Washing. These Rocks and planks washed too. Wash in kinda a funny word, isn't it? |
And Now, on to the flocking. Which I am going to go over in some excruciating detail that no one will care about but future me when I come back trying to remember what I did.
to start, I gathered my small supply of flocks
 |
| These things tend to collect over the years... I also bought some bog tubs on purpose |
Since there are 3 boards, and I'm thinking about the future (not like long term future, not serious future like saving for retirement or my kids college) when I'll add more scatter elements: I created a foundation layer of flock consisting of roughly equal parts of "Summer Lawn blend" and "Grass Turf blend" (both from Scenic Express in the large tubs). Because I like the shade of green it made. The idea is; if I use this mix as a foundation on all 3 boards and any future projects then everything will basically have the same tone. I also prefer Flock and Turf mixes to static grass just because I think the flock and turf goes on easier and looks better with the method I use for application.
Speaking of application (Trans-sition! Transition is what we did there), it's an easy job of using a large paint brush and brushing on watered PVA glue and then spreading the flock over it in handfuls. Basically, sprinkling it one thickly and then pushing it around gently.

.

This is done over a drop cloth of some sort. Let dry for a day and night. Then tip the board on it's side and using your hand or another large paint brush, brush off all the loose flock onto the drop cloth so that you can collect it and reuse it. because I'm not made of money.
 |
| What and exciting picture this is. A pile of loose flock being gathered. |
Alternatively, if you were doing one large piece as you were laying on the foundation flock you could slowly add in higher and higher concentrations of a different shade, in order to create variations and avoid the golf course look. Which I didn't do this time, as I had a different plan...
 |
| foundation flock layer. |

 |
| Success! All the boards match together. |
The last steps are adding in some colors and variations and details. This is an imaginary setting as this project is for games with my Quar miniatures. And in my imagination the Quar live in a bright and colorful world. To create this effect, I first put some bright colors mixed with some bright green flock into some tubs..
 |
| Purple, Blue, and Yellow. |
And more or less hoovered over the boards and just sprinkled this stuff everywhere I wanted to. Sometimes going a little heavy. All this stuff was just sitting on top of the foundation. Then I took a trick that every terrain Youtuber does so I thought I would give it try; using a spray bottle on the mist setting, I would spray everything with Isopropyl Alcohol (which out of all the alcohols, is the hardest to spell) and then spray everything with watered down PVA glue. And when that spray bottle clogged (because they always fricking clog) I used some Gorilla spray glue.
This was a big hand work out. Luckily I've been training for this moment my whole life by doing other hand workouts late at night for about 20 mins which also involved a small mess..... ... That joke was purely only to keep my PG-13 rating.
And I tell you what, those Youtubers know what they're talking about because that locked everything down tight. I gave it a hard blow and nothing moved. But then I remembered I got these broken smokers lungs and my hard blow is probably more like a baby's fart. So I brushed my hand across it and still nothing moved.
Lastly and I do mean lastly: laying on the other scenic details..
 |
| Some of the other scenic details |
This included Gras tufts from Army Painter (which I though looked terrible on a miniature base so stopped using them, but look good on the boards), flower tufts from Gamer grass and this stuff called flower Soft which is for scrap booking but I've been using for years... lots of items bought from Scenic Express which is for model railroads, and small clump foliage called Undergrowth....
And then glued these on wherever I thought looked good. I put these closer the center as I think the edges will be covered by scatter pieces.
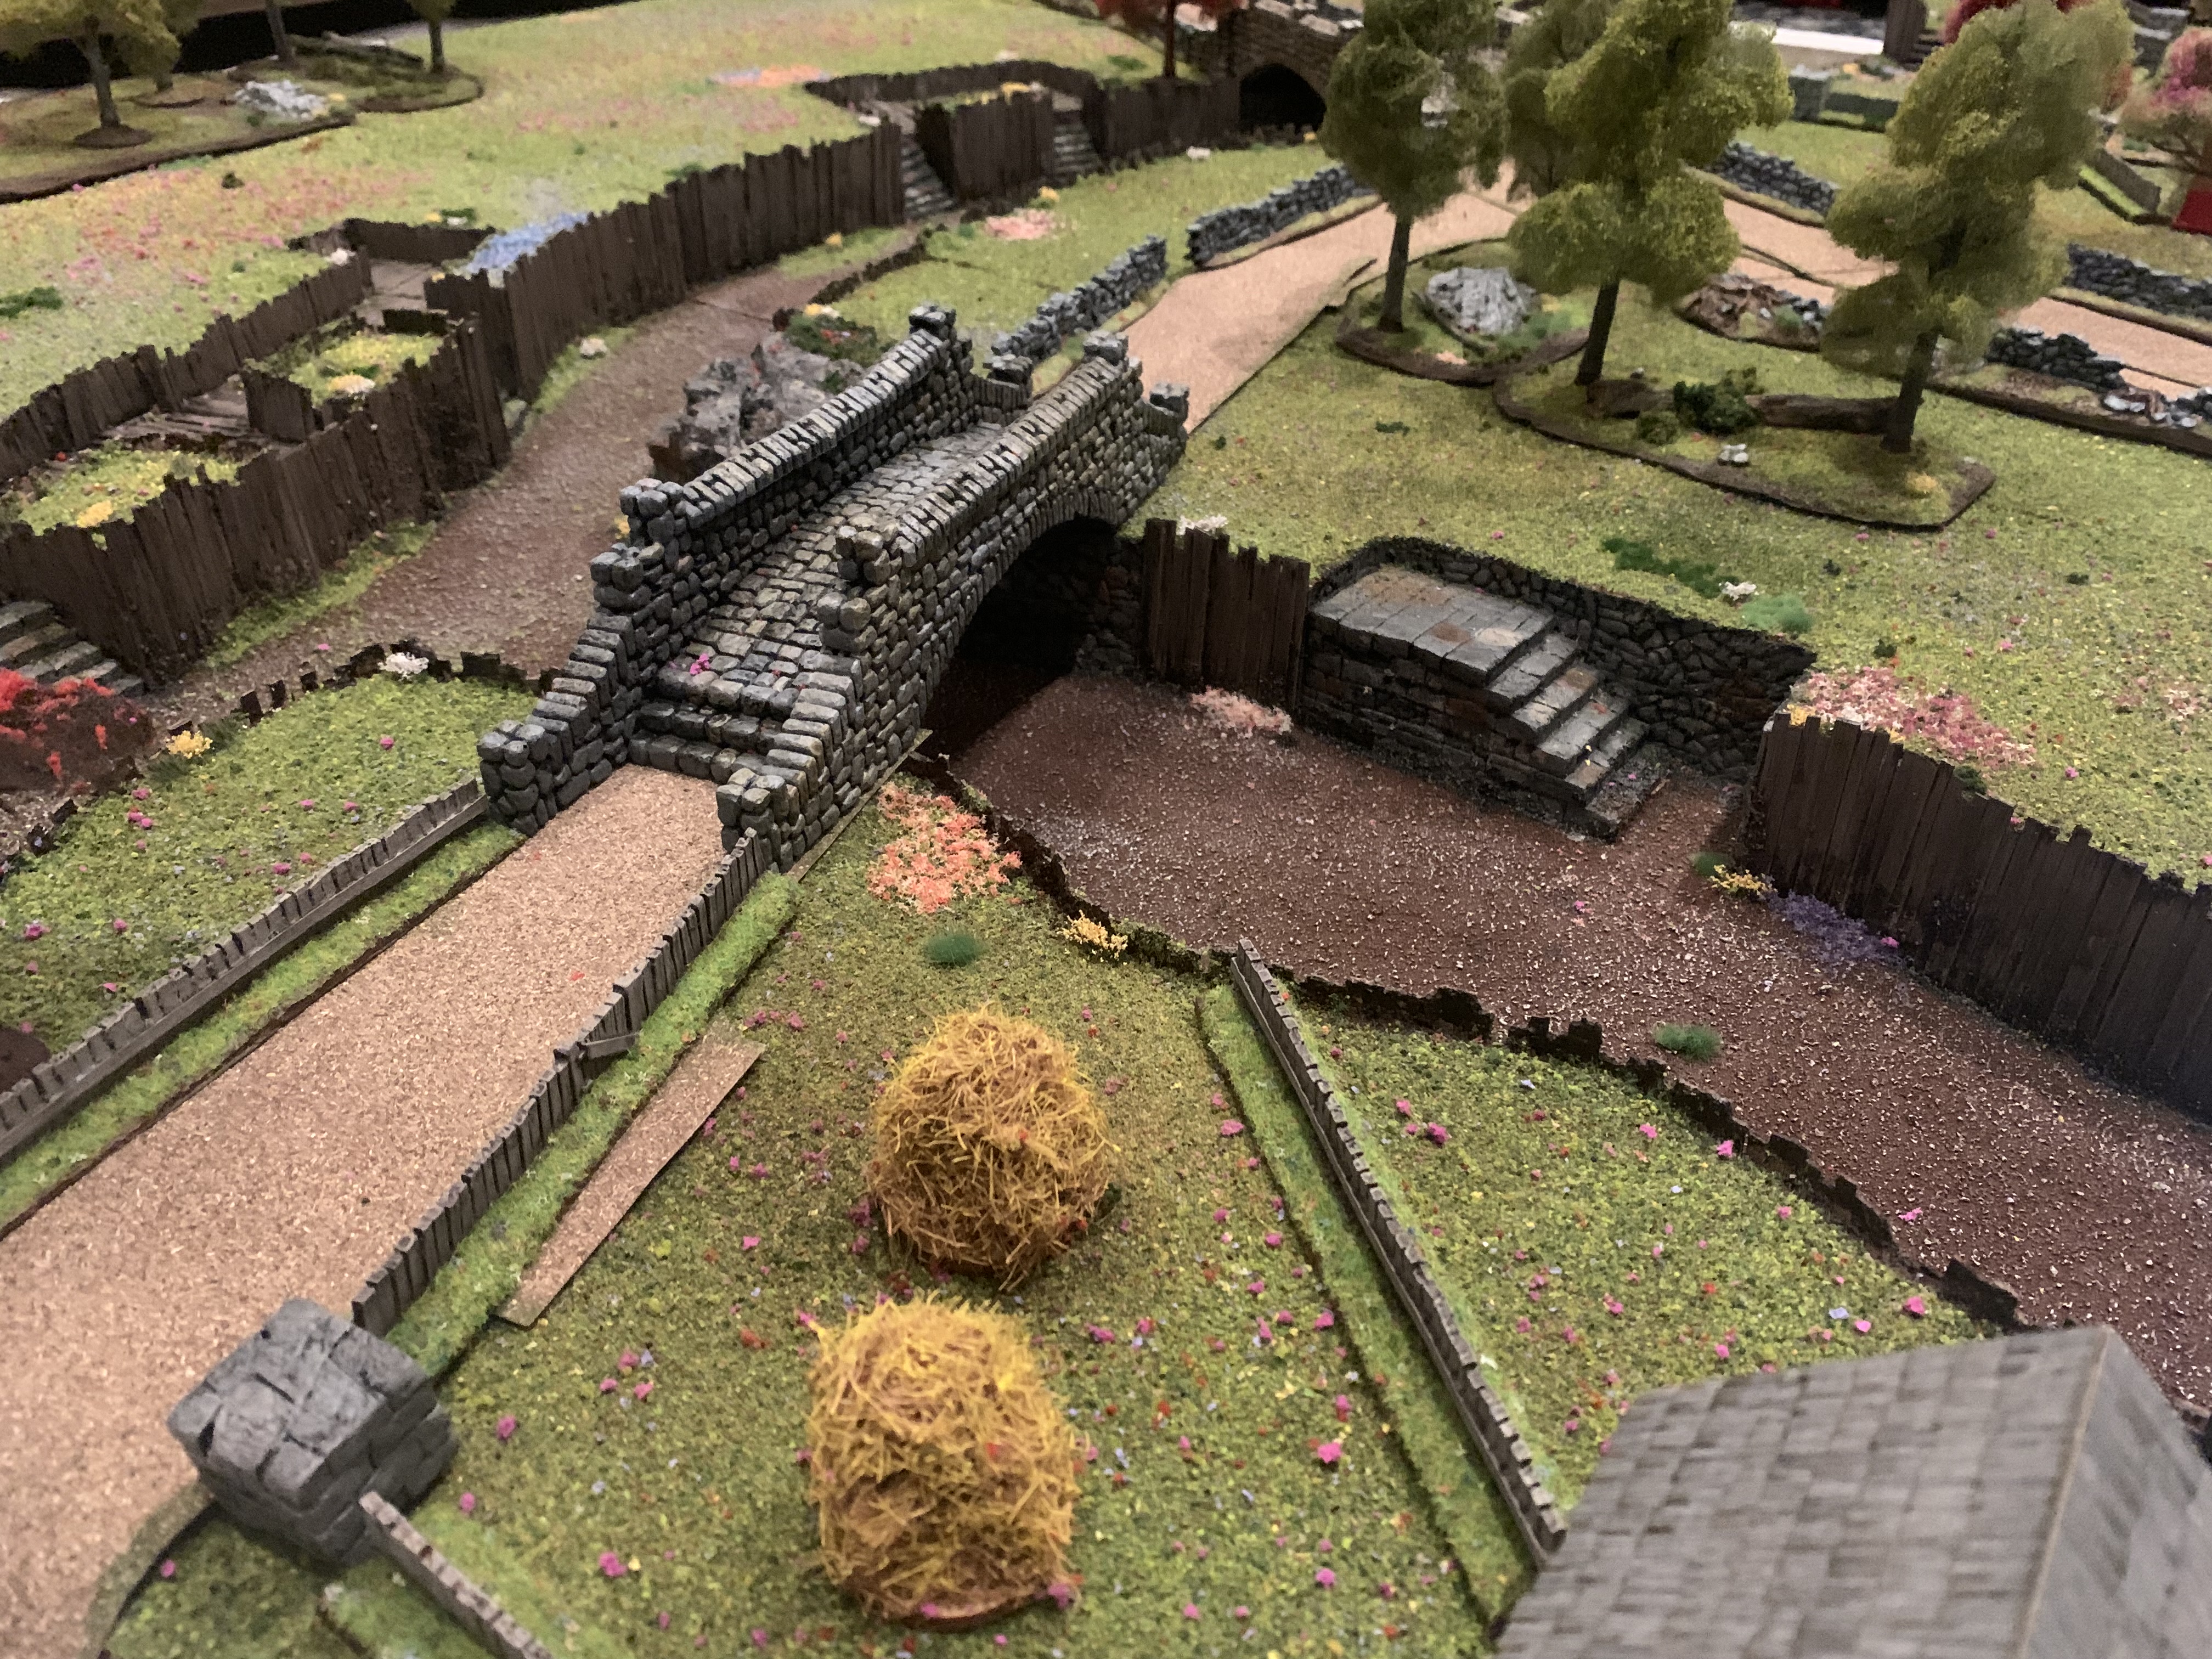
Big Reveals
So this is the finished product. 3 sections each 2x4 for a 4x6 surface. I am overly proud of it, so took way too many pictures. Like a new parent with their first baby.
 |
| The basic boards |

What? You wanna fly a drone over it and see the landscape closer? I thought you would NEVER ask...


Let's put some terrain on it: I have many matching and complimentary scatter pieces in my mind yet to be built, so in the meantime we'll make do with my existing stuff...


 |
| I particularly like this picture. Kinda nails it. |


In my imagination:
This is an area that long ago was much closer to the front lines, but as time passed and the war changed, the front lines moved on, and in the years afterward the Quar moved back in and resettled. The Trench Highway was always useful so was maintained and served as a reminder that Time is cyclical. For once again there is smoke in the air as The Long War returns....
Double thanks for writing a comment.
Brilliant result, Stew! You even added pink trees! Might look funny fighting ACW battles over this Hallowed Ground.
ReplyDeleteThanks JF. Working on more opine trees now.
DeleteMy ACW stuff is 15mm, so no worries there. 😀
Very pretty Stew! As pretty as trenches can be that is....☺
ReplyDeleteJust got to store them somewhere safe and free from damp and dust and spiders....
Neil
Thanks Neil. Because I have a of endless holding. 😀
DeleteWhat a fantastic result Stew!
ReplyDeleteI would not be surprised if you could get this published in one of the wargaming magazines or see it in the next edition of the Quar rule book. Wow!
Great post as well. Lots of fun to read.
Thanks Ben. It would surprise me!
Delete😀
Thanks again for commenting on the writing. It’s hard to be informative and funny.
In my head, the Quar fought in WWI-style trenches (which is why my advice was almost completely wrong for what you're going for) and as soon as I saw the art, I was excited to see the terrain because I knew it would really stand out. While it might beg belief to see so much beautifully intact plant life among trenches, there is something very idyllic about it at the same time. Most importantly, the terrain looks fantastic and all came good in the end. That's what master painters and terrain-makers do! Well that and never doubt themselves but neither of us has ever done that! ;)
ReplyDeleteThanks Jeff. Never for a moment.
DeleteOn my mind the trench has a long sorted history. And this is but another chapter. 😀
You have done a very fine job on this Quar trench system Stew - it looks pretty much like the original artwork you took as inspiration! You have got HEAP's of different flock, by the way!
ReplyDeleteThanks Kieth. The flock kinda accumulated over the years. But I only used 3. 😀
DeleteFantastic result sir!
ReplyDeleteThanks!
DeleteSimply lovely! The vibrant trees really tie the project together with the artwork. Well Done!!!
ReplyDeleteThanks! More trees on the way.
DeleteI’m glad you approve as you are an inspiration yourself. 😀
In your last post, when I saw the end flocked result, I wasn't sure about it, but since seeing the reference picture that inspired the boards, I now get it, well done for getting this finished, and you can now return to your favourite part the gaming.
ReplyDeleteThanks Dave. I actually enjoyed every part of the terrain, lot more then painting miniatures. 😀
DeleteAbsolutely superb Stew...
ReplyDeleteThank very much. 😀
DeleteStew those boards are fantastic, been great watching them come together. Now you need to get the Quar on the table for their first battle on it
ReplyDeleteThanks Neil. First game in 2 weeks time. 😀
DeleteGreat result Stew, and the black wash was definitely worth the effort. The flowers and tufts look terrific and you resisted the urge to overdo them, which is something I have to battle against.
ReplyDeleteThanks Lawrence. It’s more a factor of time as we got to call it a night sometime. 😀
DeleteNeat, you've matched that original piece of art perfectly. A very pleasing finished result. Now I have trench envy. One day I will tackle this project, but today is not that day.
ReplyDeleteThanks TP. Kinda hoping you would see this. Very pleased with the results and your blog / terrain was and is an inspiration. 😀
DeleteSplendid finish and a great match to the concept art! I like the liquatex ink although I find the wash goes off after a while if I dilute it with water, mind you I've never bothered with adding the medium so maybe you'll be fine, I did the same kind of thing about 25 years ago when I decided to mix up 5 ltrs of masonary paint with sharp sand in it to an olive green colour for basing troops and terrain, I've only got 4.95 ltrs left now, think it will probably outlast me and my daughter will have to throw it out when I'm dead!
ReplyDeleteBest Iain
Thanks Iain. You’re probably right about the green mix. But that’s her problem. 😀
DeleteI’ll keep a lookout for the wash…not washing.
That looks absolutely amazing. As mentioned by others, I was sure about it as I also had WW1/trench crusade in my head, but the reference picture brings it all together and makes it uniquely Quar and perfect for it. Well done for sticking wit as it’s a great result!
ReplyDeleteThanks Jamie. Yeah, trench crusade is a little too grimdark for my liking. But this should do nicely. 😁
DeleteCracking work Stew and as mentioned before, the flock really brings it all together. lots of lovely shots of the board and figures to enjoy:)!
ReplyDeleteThanks Steve. I'm glad you like it. 😁
DeleteWith the trees and meadow blooms it makes me think of some Studio Gibli animes - which is amazing. You outdid yourself mate, truly wonderful work. I look forward to seeing games played on this.
ReplyDeleteWhat's next for the Quar?
Thanks Dai. First outing will be next weekend when I bring it to a convention.
DeleteI figure that now that's it done, I could work on some more terrain or paint figures...
Probably more terrain, as all this custom terrain in my head yet to be built...😁
That looks fantastic! Well done!
ReplyDeleteThanks Barks! I appreciate your comment. 😁
DeleteLove it, and hope to see it in person sometime. Looks like the sort of trench line where when the officers are napping the ryflers get out of the trenches and exchange goodies and play quar-ball.
ReplyDeleteThanks Dave. I'm sure you will. 😁
DeleteBrilliant Stew! These looked great at every step and absolutely marvellous in their completed state.
ReplyDeleteAnother beaut bit of home-made terrain by your good self.
Regards, James
Thanks James. Kind of you to say. 😁
DeleteThat's a splendid table, especially with the terrain on it!
ReplyDeleteI'd like to build one some day (space and time permitting) but I think I might do smaller sections and in a "geomorphic" style - so that they can be turned and arranged differently to create different and unique combinations.
I know that will take a lot more measurement and planning, but with a smaller table I need to economize on space and versatility.
Thanks HH. I'm sure yours will be splendid.
Delete😁
Stew,
ReplyDeleteGreat work. I did a double take of the treed photos and the just trench system. QUITE rhe effect
Thanks! It works out. 😁
Delete