
In this post we wrap the three part saga on creating forest terrain, and see how it all came together.
Part one can be viewed HERE
Part two can be viewed HERE
But first, an exciting discussion on the correct height of trees.
Getting the CORRECT Height of Trees is Crucial to Wargaming
No, not really. Doesn't really matter at all and is a matter of personal taste. Whatever looks right to you or me. This is just my take.
My wargames based on land where trees are most likely to be found (versus the ocean) is done in 2 sizes; 15/18mm and 25/28mm, which means I want trees to be compatible with those.
Unless you are making trees from scratch (some folks are mad enough to attempt this) you are buying trees or tree making kits from somewhere. In the not long ago, I liked using Woodland Scenic pre-made tree packs because they are easy if not a little bit samey (but more on that later) which come in useful sizes for my wargames; 1-3", 3-5", and 5-7". let's look closer:
 |
| From left to right: 3" tree, 18mm ACW miniatures, 5" tree, 28mm AWI miniatures, 7" tree |
From the picture above, you can see that all the trees are pretty much compatible with the figures.
pretty much; but not 100%. The 3" tree is a little small for the 28mm figures. It's usable, but doesn't look like a tree you would find in a forest, more like the trees you would find in a new housing development or in the middle of a road island. The 7" tree is too big for the 18mm, though is probably closer to being in actual scale from a human to a tall tree. But it just looks weird, unless you're explicitly playing a wargame in the Redwood Sequoias. Probably a game called "Squirrel Wars."
 |
| From left to right: 3" tree, 15mm building, 5" tree, 28mm building, 7" tree |
However you don't want to forget about buildings. Battlefields will have often have buildings as well as forest areas. Least all the cool ones do. ME. myself, and in my own opinion" I like it when the trees are as tall or taller than the houses. That looks right to me. Again, the 3" tree doesn't match the 28mm house; it's too 'full' or mature to be that small compared to the house. And again, the 7" tree is way too big for the 15mm house. It towers so high above it that the two look kinda silly together.
Ground scale is always out of wack in miniature war games, and that's alright, we're not building model railroad tables. But I think it helps if things aren't too out of wack, or at least as close to being in scale as able. Which means that I like to avoid those extremes on either side of the spectrum as illustrated.
All of That, Just to Say:
3" trees are too short for 28mm, 7" trees are too tall for 18mm, 5" trees are just right and fit both pretty well. But since I want some variation in heights of the trees because it is pleasing to the eye, I get the whole spectrum. 3-5" for 18mm, and 5-7" for 28mm.
I know that's not very interesting. I was kinda bored halfway through writing it. But it took effort and time to write and take the pictures. So there it remains. Sorry I tricked you.
Trees for the Forest; Think like a Tree, Be the Tree
I'm gonna need a lot more trees. WHY do we always need more trees?! I already have a bunch of 3-5" and a few 7-9" trees. And because I am a glutton for punishment, I decided that I wanted to make them as pretty as possible. Because the whole point of this forest project is threading that needle between pretty and functional. As I was saying before, you can buy premade trees. I have PLENTY of these that are made with clump foliage. These look fine, but altogether a little too neat and factory uniform. I thought that with a little more effort I could make trees more leafy and unique. I could of just bought more expensive prettier trees but where's the fun in that?
I watched some videos online on making trees and found a method that produced good results and was easy enough to try...
 |
| I got a bag or two (or three) of the tree armatures. Notice that they're 5-7". |
 |
| How one looks out of the package. |
 |
| Shape the tree trunk and branches. Snip off branches and twist the truck to get a suitable tree shape. I found through experimentation that cutting off about 1/3 to 1/2 of the branches makes a nice shape. Also, to twist the tree trunk you'll need two pairs of pliers, one to hold the trunk at the bottom and one to grip and twist. Unless you have fingers like vices from hard labor. Mine are soft and delicate from playing with dolls. After you twist it, give the truck and branches a quick heavy dry brush of light grey or tan. It actually really helps with the appearance. |
 |
| Bases for individual trees. |
As discussed in the last part, some trees are gonna be based on larger terrain bases and some are gonna be based individually. For the individual trees, I glue the tree base to a metal washer and use concrete patch for the ground texture (I use the same on my miniatures, because it's heavy like concrete). This will make the tree bottom heavy and more stable. Paint it up and add some details as you wish.

To create the canopy of leaves I'm gonna be using this stuff called Poly Fiber. It's kinda like pillow stuffing but not. Take little pinches of the stuff and pull it in all directions to get light fluffy irregular shapes of varying sizes. "Wispy" would be the word to shoot for.
When you have enough for the tree, simply glue them onto the tree branches where you like..
 |
| Like so. starting to look like a tree now. |
Most of the videos I watched on this technique used Hobb-e-Tac to glue the poly fiber to the branches. But I know from previous experience that Hobb-e-Tac...sucks. sucks hard. So I just used white glue.
HINDSIGHT TIP: I'm actually showing the 6th or so tree I've made and I've picked up some lessons along the way:
When it comes to amount of poly fiber to put on the tree, LESS is MORE but there is such a thing as TOO LITTLE. Basically this stuff will form the foundation of the leaves and there is a "just right" amount. If the poly fiber is dense then the leaves will look really dense. What looks better is when you can kinda see the branches through the leaves. It took me some experimentation / trail and error to nail down.
When the glue is dry it's on the next step; more glue! I should invest money in glue stock, seems like everyone needs it. This next step really brings the tree to life...

Use a spray glue, gently spray the poly fiber to cover it. I used a glue from an aerosol can because it's what I had, but a glue in a pump spray would probably work a better.
I couldn't show this next step because I needed both my hands; but take some flock like course turf or what ever you think will look good, I've been using a variety just to experiment as will be seen later, and then SPRINKLE it over the poly fiber. Try to avoid the tree truck. What will happen is that the tiny bits of flock will get stuck in the poly fiber and the whole thing will start to look a lot like leaves.
HINDSIGHT TIP: I do mean sprinkle. Like when you take a pinch of cinnamon and sprinkle it over a delicate pastry (we all do that right?). "Drizzle" might be a better word. If you use a shaker it'll go on to heavy and loose some of the cool effect. Truussst me.
At the end, it comes out looking like this:
 |
| It's Tree-riffic! |
Put It All Together to Make a Forest
Was this all worth the effort? I dunno, but one gots to do something beside watch TV after the kids go to bed. Let's put the bases and trees together and see how it all turned out.
B to the T to the W: I didn't show flocking the terrain bases. I figured most folks already have a handle on that (put down glue, put down flock, voila), and the colors and styles are all personal tastes and what someone has available.

 |
| Smaller base #1 |

 |
| Smaller base #2 |
 |
| Both together, with some random 28mm Shepard looking dude, just for scale. |
I'm thinking they came out pretty good. I guess these can be used on their own to line a road or something, but the plan was to place these on the larger base as a way to add more character to it.
Speaking of the larger base...

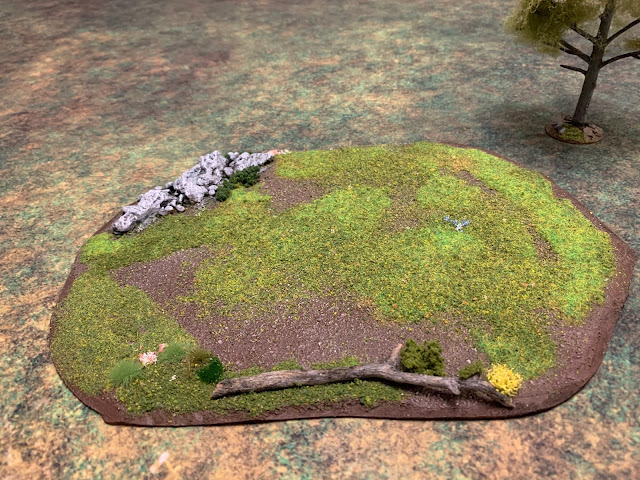


 |
| The larger 10ish by 11ish base. With some of the individually based trees I made. |
Proof of Concept
Smaller base on the larger...


I do like the look of the smaller base on the larger. I'm not sure how to describe it, but the smaller base with all the crap extra details on it helps to break up the flatness of the larger base. Not sure it is really necessary though but what is in this silly hobby?
More importantly, I think it looks pretty and should be functional since I can take off most of the stuff to make room for miniatures. I'll call it a successful experiment.
 |
| Top down look. |
Final thoughts: While I called this a tutorial, everything I did I copied from something or someone else I saw on the internet, who did it better. I really have two goals in doing this project; the first is to get some cool terrain for my tables (obviously). The other is just to add to the body of knowledge that is already out there and provide some encouragement to try it out. So if you liked the way these came out and want to give it try, you should go for it.
Hope you enjoyed this series of posts. Now I have to decide if I am gonna do the rest of the forest bases or get back to painting miniatures.
Thanks for reading.
Wow, gorgeous trees...and bases, well done!
ReplyDeleteThanks very much Phil. 😀
DeleteThis has been a helpful series on tree building. Your results look fab so your process and explanation are solid. Mounting trees within a larger and separate forest base is a clever idea.
ReplyDeleteThanks very much JF. I do think that the smaller more scenic base inside the larger looks nice. Seems to come together well. Glad you enjoyed. 😀
DeleteIf you really want to be adventurous, mix up your foliage-ing process a little too. Try doing some gluing on clump foliage etc. I think the more variety in height, and more variety in foliage, the more it "sells" the forest. Same thing with basing - you're looking for a layered mix of colours and textures. I do like the effect you've got here, though. Haven't seen the pillow-stuffing thing before, will have to see if I can find some.
ReplyDeleteThanks FMB. You read my mind about various foliage and I am gonna try to achieve a little more variety in the future. Like any good wargamer I got a ton of stuff lying around just waiting to be used. 😀
DeleteGood looking trees! I liked your comparison shot of the different sized trees, trying to bring order to chaos!
ReplyDeleteBest Iain
Thanks Iain. Juuust a little bit of order. Not too much. It’s all just personal preference anyway. 😀
DeleteNice job, the pillow fibre looks a useful product. I have use lichen hot glued to branches for the same effect, but that can give a very dense result. The cross over in tree heights is interesting, though sometimes, you just need so many trees, that everything gets grabbed without too much worry about scale :-)
ReplyDeleteThanks Norm. It’s true we always need more trees. Usually any size tree works with miniatures and no need to be too picky. Though as I said, I like it better when the trees match the buildings.
DeleteMy first trees came out on the dense side before I really got the hang of it. But still useful for trees. Just really healthy trees. 😀
Very nice finished result mate!
ReplyDeleteWondering though, with the sprinkled flock for leaves effect, using a "during game" situation, do you think you'll find loose flock falling off when you move them about or did the flock stick to the glue already there?
Thanks Dai.
DeleteI don’t think the trees shed flock any more than anything else. Spraying the poly fiber with glue really locks it in and the whole mess becomes fussed together. 😀
Nice work and results Stew! Once you’ve got everything laid out now I’d say carry on with the trees.......
ReplyDeleteThanks Mike! I think you are right, gotta go where the motivation is...😀
DeleteThose look really sharp, my friend! I got flashbacks to a lot of lessons and mistakes I made while making trees while reading about your experiences (never use Hob-e Tac!) and I'm glad you avoided some of those headaches. I think these trees look better than the typical Woodland Scenics ones do and I'm going to have to branch out (horrible pun unintended) and try some in the future as I never felt like the trees I made were as realistic as I wanted. I really like the stacked bases too as I think they do give a bit of height and break up the bigger base pretty well but without sacrificing playability which is definitely key. All in all, I'd say this is a job very well done :)
ReplyDeleteThanks a lot Kuribo.
DeleteI remember your experiences with hob-e-tac. I’ve had my own poor experiences. I am very pleased with the way the trees come out once I got the hang of it. It’s actually pretty simple to do and I encourage you to try it. There are some fine YouTube videos out there that I watched.
I do like the bigger more scenic bases inside the larger one. Overall all I’m pleased with these results. Now to crank out several more and try some more experiments. 😀
Looking great! Thanks for the comparison shot with the 15mm/28mm that was really helpful in visualizing the whole thing.
ReplyDeleteI am looking into this sort of thing myself since I am mostly done with the buildings... anything to avoid more figure painting. (plus I need hedgerows and such and the techniques are similar)
Thanks Laz! Glad you found the comparison interesting; I feel I was losing my way while writing it. . I know what you mean, I guess I’m just bored with painting miniatures right now. Good luck on your hedgerows I made some years ago out of Brillo pads and tons of flock and stuff and think they came out pretty good. They’ve held up well over the years. 😀
DeleteGreat stuff Stew! You really knocked it out of the park with this series, your results really speak for themselves 😀
ReplyDeleteThanks very much Ivor! 😀
DeleteNice tutorial: thanks for taking the time to put it together (and the trees, too, of course). Keep working at it and some day your hands will be tough enough to twist real tree trunks!
ReplyDeleteThanks Ed. I’m glad you liked it. As for tree trunks, I doubt it. I have a strong aversion of doing anything that’s hard. 😀
DeleteI like the open style of the trees 👍
ReplyDeleteThanks Matt! 😀
DeleteVery nice trees there Stew. One thing I don't have in my personal terrain collection as the club has boxes full of them and most of my gaming is done there.
ReplyDeleteThanks Tony. You’re lucky not to need them. Those of us that supply our own never seem to have enough. Kinda like snake rail fences... 😀
DeleteNow fences, that's different. :)
DeleteWow, poly fiber! Who would of thunk! I'm going to have to try that. Of course at my 1/1200 scale, I won't need much......
ReplyDeleteGreat work Stew
Thanks Vol. it’s funny the things one learns on the internet. No you won’t need much for your 1/1200 scale ships, and not many trees in the ocean anyway...😀
Delete5 years too late, but love this! Attempting my own trees soon :-)
ReplyDeletenever too late to tell me that you loved a post!
Deletemuch appreciated. 😁