
Hello all; I've cobbled together my 28mm AWI buildings from Sarissa. In this post I'll show what I did and pretend that I knew what I was doing and ya'll can nod your head and play along...
Let's begin, it'll be fun.
MDF Buildings need Love Too. A Lot of Love it Turns Out
Alternative title: Set expectations to 'presentable.'
I'm still procrastinating starting the lead pile of American AWI infantry so I tackled some more terrain.
After all, I didn't buy these Sarissa North American houses for nothin.
As I was putting these together I was struck by how very plain the MDF kits were; really just basic wood shells with very minor details. The kits are fine in themselves, went together smoothly and are solid enough to withstand clumsy wargamer hands. In these initial phases I kinda regretted not getting buildings from 4ground. 4ground buildings once built are done and ready to go (the only negative is that each one looks like every other 4ground building) and these Sarissa buildings once done still require effort to make them look pretty.
It's like the difference between men and women; men get out of the shower and are ready to go and women have another 45mins of hair and make up. Unless you're into man-scaping, I don't judge, I had a metrosexual phase too.
So these buildings will need a little love before hitting the table; problem is that after loving Wife #1, The Kids, Select Members of my extended family, and strangers on the internet, I don't have a lot of love left to give... in other words I wanted them to look decent but not put in too much effort. Let's see if I was able to thread the needle between being lazy and getting some presentable results.
As a refresher, the buildings started out looking like this:
 |
| "Please love me" they say. |
 |
| "Come Closer" |
Were You Born in a Barn?
One time saving / lazy technique I tried was simply to spray paint the buildings the color that I wanted them, versus priming them white or black and spending a lot of time painting them. This worked OK. I learned that if you spray from far away the etched details (like seams in boards) are maintained.
I also learned that you have to seal the spray paint with a varnish before you paint over it. Otherwise the spray paint just sorta repels the hobby paint and it takes several coats. There probably some cool science-y explanation for this.
 |
| The Barn was spray painted red, and the windows and doors picked out in white. I thought this looked suitably Barn-ish. Aren't all barns red? |
 |
| But I was bothered by how bare the inside appeared. It just looks unfinished and like it's missing something. |
It's the floor that is then most jarring and needs help. What goes inside a barn? Obviously hay and straw. But I've never been in a real barn so what do I know?
I found THIS helpful post from Pat over at the blog of Wargaming with a Silver Whistle, well known for his terrain, on how to make hay stacks from door mats. Thought I would give it go..
 |
| Take a door mat and cut it into small strips. I have lots of this door mat material lying around from my FoW days. It's ubiquitous for fields in 15mm. |
 |
| Then using my manly strong hands I cut the material off the strips. Slightly messy, but getting a pile of straw / hay raw materials. |
 |
| Covering the floor of the barn with white glue, I suddenly thought: "Wait! Maybe I ought to try this out with a spare base of something...eehh, too late now. Fortune favors the bold and all that." |
 |
| The "straw / hay" was then push into the glue along the floor and let dry. When does straw become hay anyway? |
 |
| After it was dry, I dry brushed it with a dark yellow and then a bright yellow. Overall, came out looking pretty good. A big improvement over the bare floor anyway. |
 |
| Some troops in the Barn |
And now for the roof. Again, being lazy and not wanting to be crazy like Lazgun over on his blog making his own shingles (and buildings), I simply bought some premade ones. I was alerted to the existence of these from hanging out on the TMP forum.
 |
| These were very handy and easy to use. Just glue them onto the roof in overlapping strips. |
 |
| Completed Barn viewed from the outside. |
Our House, is a Very Very Very Fine House
I have 4 of these Sarissa houses that all basically the same. I don't know if that will be a good or bad thing once they're on the table because maybe it'll be too uniform. But it's what I bought so it's what I got. Maybe they all just belong to the same HOA. (I don't like it when my house has an HOA, but I love it when your house does!)
During the process of building the houses I took pics at different times because I was not organized and was kinda finding my way, completing a step on one house influencing how I did the next...
First up I spray painted the houses like the barn, using off whites or whatever color and then sealed them with varnish. When dry I painted the window and door frames and what not..

 |
| Work in progress shots, you get the idea. Paint up the outside as you see fit. |
Some of the houses had a stone pattern along the foundation and all the chimneys have stone etched detail, which I did NOT feel like painting. Instead, I remembered this tip from The Tactical Painter (who is MUCH better at prettying up these Sarissa kits) of using embossed paper with a stone or brick pattern.
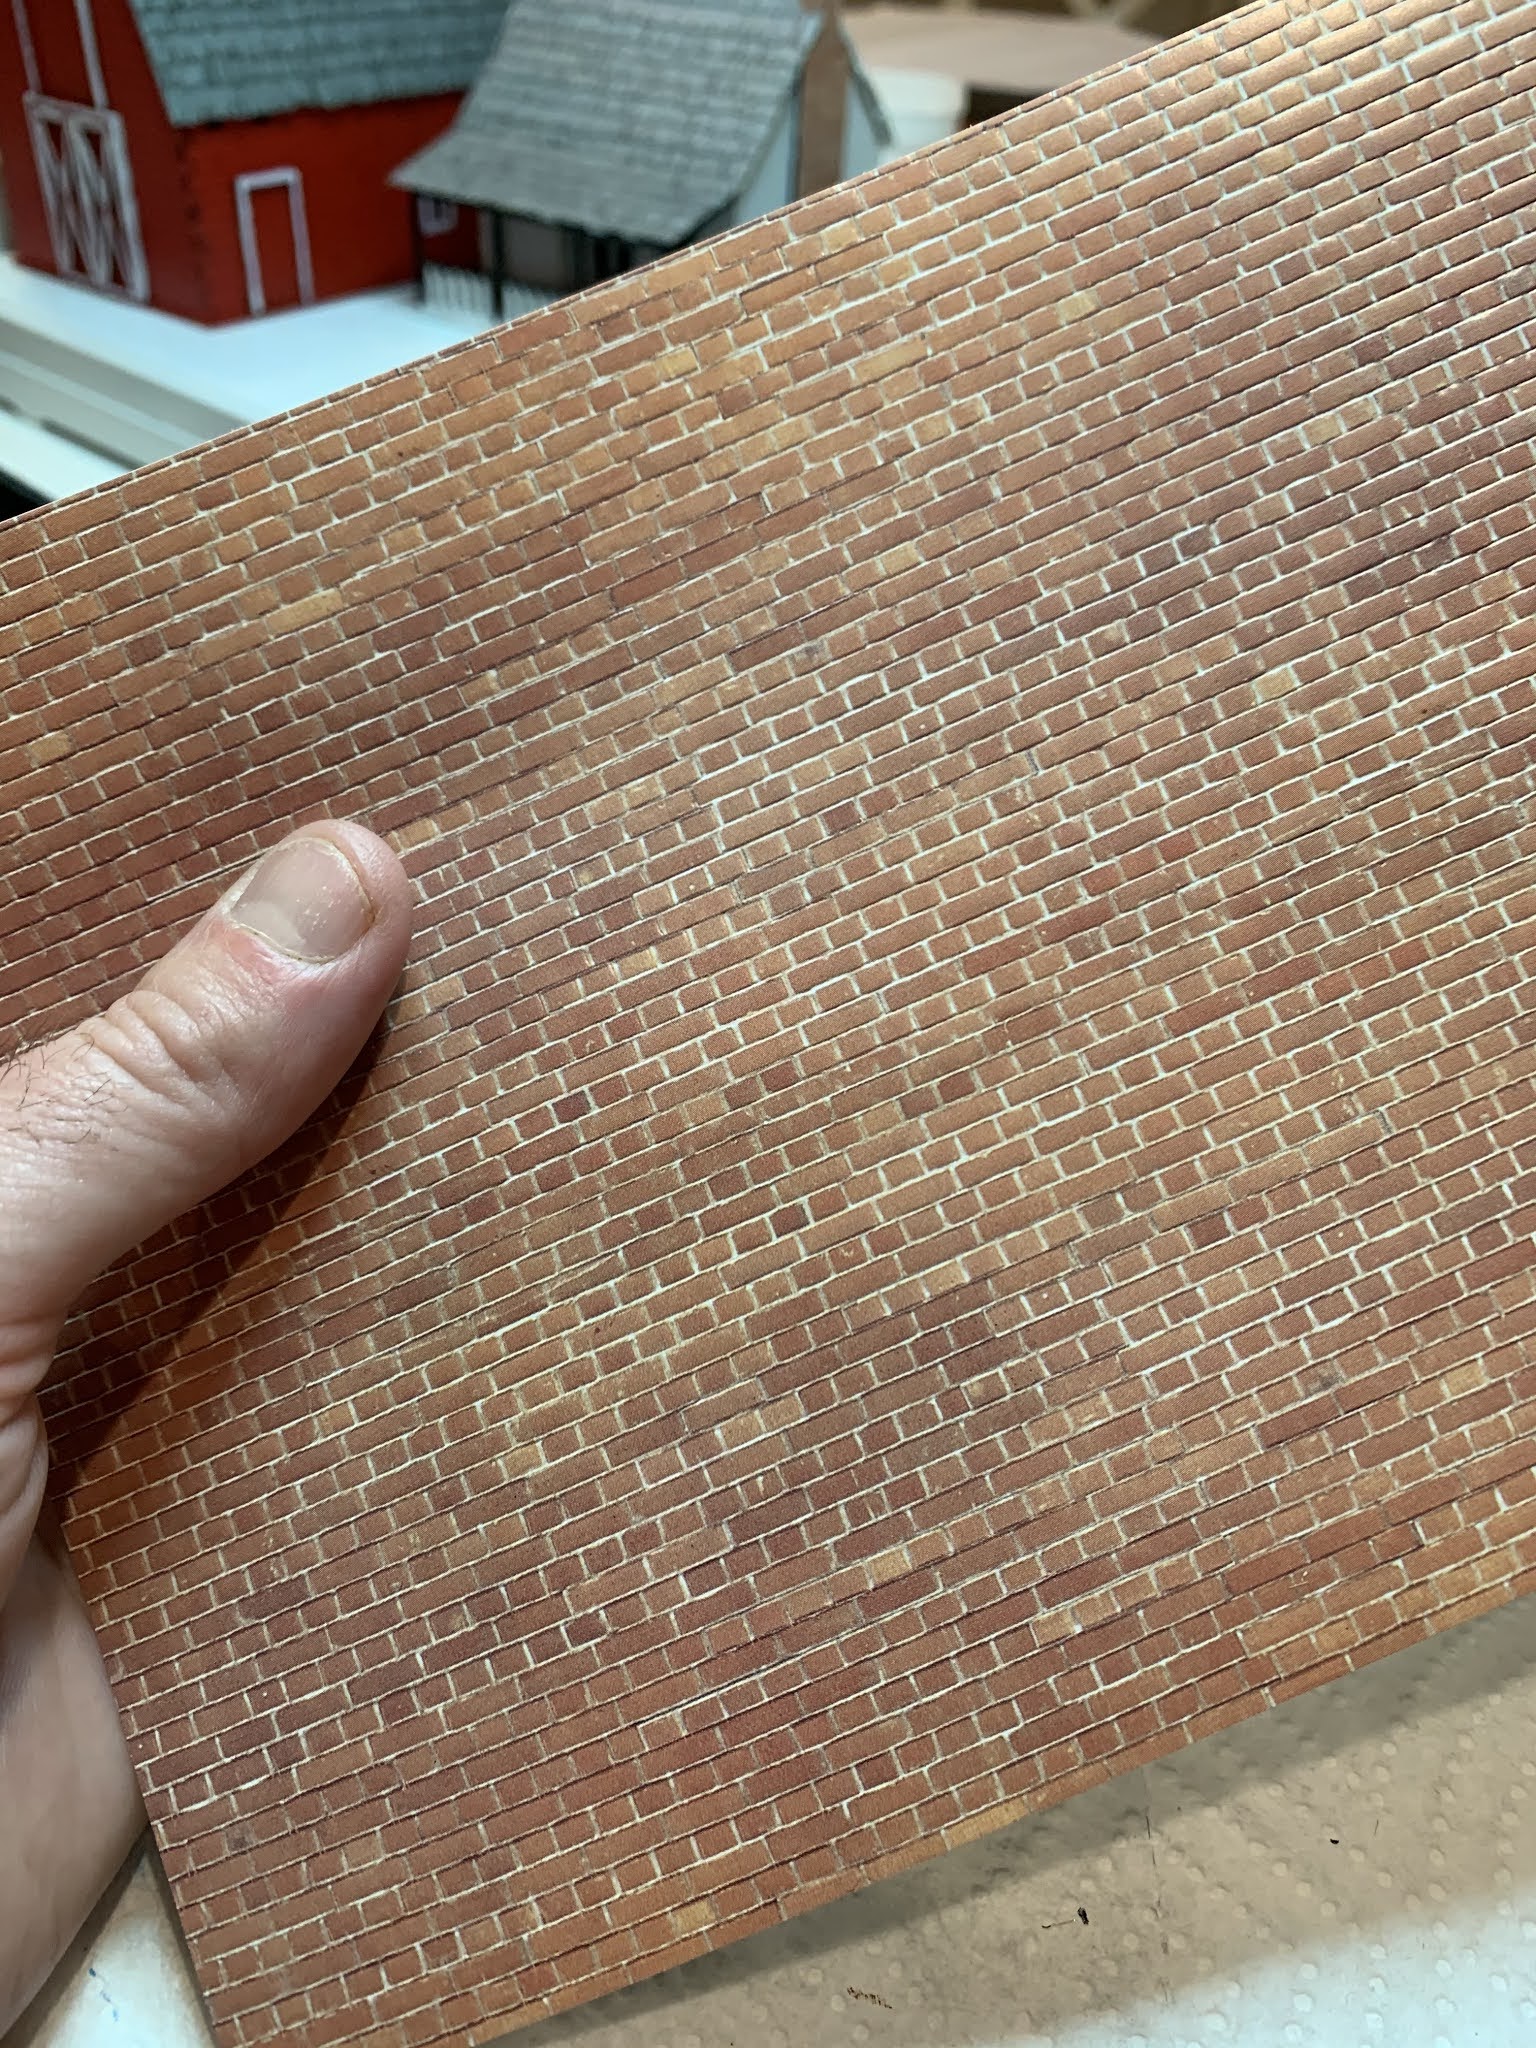 |
| I picked this up from the same online store that I got the roof shingles. |
It's a simple matter of cutting the paper to shape, and gluing it onto the model where you want it.
 |
| Instant foundation and chimney. You can see another house in the background |
BUT WAIT A SECOND! Are those bricks in the chimney going vertical instead of horizontal? What a silly mistake. I'm sure no one will notice even though I just noticed and I'm sure I only did that once...
 |
| GAAAAH! Both of these. I'm gonna have to fix it because it'll bug me. |
 |
| That's better. Actually looks more like a chimney. |
The inside floors of the houses have some lines denoting floor boards so that is alright; enough detail for me. Just paint it brown. Everyone in the AWI has hardwood floors. Which just leaves the inside walls and chimney looking a little out of place.
Bricks can go in for the inside chimney, and I had the idea of using dollhouse wallpaper for the insides of the house. These aren't log cabins after all, so a little finery is not out of place. At first I was thinking of purchasing some in the appropriate scale, but then I found some printable designs on the wonderful internet. Yes, wallpaper existed back then, it's called the Federal Era. Extra knowledge exploding all over your brain.
I printed the patterns on cardstock (I raided my wife's supply like a thief in the night) and just cut and glued it into place. I used the parts of my 4th house kit as a template. At first I tried to make it one sheet of paper per wall with the doors and windows cut out precisely but this turned out the be hard to do, and started to feel like effort, so in the end I just guess-ta-mated and just glued cut out strips around the windows.
 |
| So far so good. Wait! Are those chimney bricks VERTICAL again? AND I forgot to leave a hole for the fire place. What an Idiot I am. |
 |
| Completed interior. I think I'll leave the chinmey as is because I'm starting to get a bad case of the "its-close-enough-itis." Besides, don't I have infantry to be painting? |
(I actually didn't steal any card stock, I told my wife I was gonna print out wallpaper and was told "That's the cutest thing I've heard."
 |
| I think this one came out better. "Shoot out the windows guys!" |
The roofs of the houses were done using the same premade shingles.
Success? From Bare Wood to...Presentable
Largely a success. While I was saying in the beginning of the post (you did read the text of the post right? not just skim through and look at the pictures? I never do that..) that I had some buyers remorse with the Sarissa kits because of the extra effort. However, now that they're done and each is a little unique building I like them a WHOLE lot better. Each looks pretty good from the outside, and on those occasions when troops enter a building there's a little something extra inside to keep up the illusion. There's something of a rabbit hole on how many details you can start to model, but on the whole I did what I wanted; the wargamer standard. One thing I wanted to do was add some window sills and such to the insides but I seem to be out of balsa wood. Though I didn't have any and it seemed like a small thing to go out and go shopping for during PANDEMIC...so that will have to wait.
Mind Games (and Final Presentation)
Because what I want in my terrain is that momentary trick of the brain; where we see the terrain items and not the material it's made from. Our brains all know that these things are not the real thing, but it's more fun when our brains tell us "that is a house...made of paper" versus "that is paper..shaped like a house." This momentary illusion is helped by having more stuff that around that set's the scene.
 |
| Recent terrain projects with some old trees |
 |
| Not too shabby for colored paper glued to wood. |


I think the AWI project is coming along slowly but surely. Thanks for reading today.
Hi Stew, yes the AWI project is coming along very nicely! Great job on the building. I had a laugh about the vertical brickwork - that's just the type of thing I'll do. The last photo really shows how well they turned out. p.s. Is the right hand building missing a veranda post? Cheers Greg
ReplyDeleteThanks Greg. You have good eyes. I broke off the post while getting the roof on the house. It took me a couple of tries before I figured out the best way to construct the houses so the roofs come off and on easily. 😀
DeleteA good effort Stew...the buildings now completed look great and well worth the extra effort. I think you are understating your commitment as I never bother with the inside of buildings my miniatures live in a world of pure distopian MDF walls. But I am sure glad you changed the bricks that would have bugged me........now back to painting those figures !
ReplyDeleteThanks very much Matt. I just wanted a little something extra and the wallpaper was simple enough if not perfectly applied. I was tempted to order some furniture but thought that was taking things too far. 😀
DeleteProbably get back to painting miniatures now, though I feel like making more terrain as well.
Great looking buildings Stew. Love the red barn.
ReplyDeleteThanks so much Ray. 😀
DeleteThe barn is my favorite too.
Very good. Accepting that they require extra work, I think that work elevates them above the 4Ground in the raw look and the investment in time will be greatly rewarded from a lot of use. I have always had a problem painting MDF, so your spray solution seems the best route. The hay on the floor is very effective.
ReplyDeleteThanks very much Norm. In truth the paint never went on super well. I tried putting on a sealer both on the bare wood and after the spray paint and still the stuff seemed to repel paint. I’d paint the floor and it would look covered only to have spots reappear requiring a second coat. 😀
DeleteYour work on the buildings and terrain are terrific, Stew! The extra work on the buildings has paid dividends. These could easily be used in Old West skirmishes too. Nice!
ReplyDeleteThanks JF. I do think they’ve come out alright in the end. I wasn’t sure until I put them on the table.
DeleteI do have a lead pile of old west stuff that I’ve never gotten around too...😀
Some really good ideas there...I love the hay/straw in the barn (and yes, barns should definitely be red!)
ReplyDeleteThanks Alastair! I appreciate the comment. Yes the hay/straw came out pretty decent. It makes me want to (someday) make a hayfield to be put next to the barn. 😀
DeleteExcellent work Stew! From plain constructs to lovely decorations on your tabletop, you've done yourself proud mate.
ReplyDeleteCould use these for ACW too - 28mm in the future? :P
Thanks Dai! 😀
DeleteI guess they could be used for ACW but I doubt I’ll be starting that in 28mm since my 18mm ACW is already pretty extensive (and still growing). 😀
Absolutely splendid results that will enhance any game. However, be watchful: these behaviors could be early indicators of model railroading syndrome!
ReplyDeleteThanks Ed. I actually like model trains a lot. Could be a second hobby...
DeleteLike I could afford another hobby or have a place to put a train layout. 😀
Beautiful job on those buildings, sir. Definitely worth fighting for!
ReplyDeleteThanks very much Steve. 😀
DeleteThanks for the shout out for my buildings, I struggle with the money/time dichotomy, and often end up doing nothing instead. So this round of buildings is sort of a miracle.
ReplyDeleteThose are some great looking buildings,and that straw floor is an excellent way to decorate the barn! The wall papering is great too, really makes it seem like a home. If you wanted to get more doll-housey, you could print out a rug and put in some wainscoting. Maybe if you do a manor house.
Also, I think straw is the dried stalk of a grain, hay is grass grown for animal fodder... to the layman it all looks like dried grass though!
Thanks Laz. I had to look up what wainscoting was but that is a good idea, maybe if I had that balsa wood. Though it’s a deep rabbit hole on how much detail you could add to interiors. Because how often are the houses actually going to be occupied anyway? 😀
DeleteYour blog deserves a little shout out.
Yes, it depends on what you want to do with the building. If it is just a LOS blocker, then it only has to be shaped appropriately, although for skirmish games, you might need some interior decoration.
DeleteSometimes the goal is just to make a pretty house for your dolls... and that is ok too.
Really impressive work on the terrain! :) It looks really nice and while I can completely understand where it might be a bit deflating when you realize the amount of effort needed, I think it really paid off. I will keep this in mind as I start to think about getting some MDF terrain for Fallout in the near future. Pre-painted might save me quite a bit of work. Thanks for sharing your experiences with this and it was a fun read as always :)
ReplyDeleteThanks Kuribo! Glad the post was fun to read as I try to be somewhat entertaining. Especially when showing my mistakes. 😀
DeleteAs things went on the whole process gets faster. The amount of work required would also depend on the kit. These were pretty basic but I’m sure even bare kits that were highly detailed would be easier to complete (if that makes sense). 😀
See? You had a whole lotta love left to give (with apologies to Led Zep)!
ReplyDeleteThanks Mile, some love still left in the tank. 😀
DeleteGreat stuff Stew! You've never been inside a barn before... consider yourself lucky my friend, consider yourself lucky 😂 That was pretty hilarious with the chimneys, thank goodness you caught that before everything was completed.
ReplyDeleteActual shingles on the buildings makes all the difference in the world, I always use them on my kits. You've got yourself a fantastic bunch of buildings there, can't wait to see you get them on the gaming table!
Thanks Ivor. Glad you enjoyed the post; it’s always hilarious when you catch your mistakes and they can be easily fixed like the chimneys. I just glued another sheet over it.
DeleteGlad you like the buildings as well. 😀
The hay on the barn floor is bloody genius. Going to steal that - the the buildings turned out great!
ReplyDeleteThanks Markus. Steal away since I stole it from someone else, be sure to click on the link to the original poster in the text above the pictures. 😀
DeleteLovely bit of work on your buildings, nicely tarted up! Not sure about the appropriateness of the cultural appropriation by you though,self deprecating and downplaying the quality of your quite obviously decent work is clearly a British approach and it's somewhat disconcerting coming from someone in the former colonies!
ReplyDeleteBest Iain
Thanks very much Iain. And if you are calling me British -like, then I’ll take it as a compliment. 😀
DeleteBloody hell Stew! I miss visiting you blog for a week or so and you knock out stuff like this which makes me look like an absolute slacker. Those buildings are great as they are but what you have done to them is truly spectacular. They look perfect for the table and the shot with your fields and crops on the table is whats going to motivate some terrain work at my place over the next few weeks.
ReplyDeleteI also use the old mats a lot for a wide range of purposes on the field but I have not used it inside barns etc. Will from now on let me assure you.
Great post, entertaining and informative as always mate. Take care.
Thanks very much Carlo. Seeing the Raging immense battle going on your blog shows you’re anything but a slacker. 😀
DeleteVery glad you liked the post and my amateur efforts.
Dang Stew, this is a great little tutorial "How to Dress a House". Great ideas here. Love the barn. I have a metal roof on mine, dirt floors, straw in the horse stalls. The wall paper is a nice period touch too. Almost looks like Francis Martin's place in the Patriot sans the plantation house. 👍🏽
ReplyDeleteThanks Vol. the barn is my favorite too. Building a hayfield right now bc the barn floor came out nicely. And a plantation house will likely be purchased in the future. 😀
Delete