More Trenches, More Quar, More Fun for Everyone.
Just so. Blogging IS so much fun. Most fun you can have on the internet but don't test that statement.
Let's get on with it.
More Work in the Trenches
Last we left off; the hero of our story had cut out a large trench and added a defensive trench that ran along side. See previous post HERES for Part One if some inclined. Yes, I am the hero of this story, I don't need to be saved, and you don't need to laugh so hard.
 |
| Where we left off. The arrow indicates where we'll focus our attention today. |
There should be a way down into the big ol trench. My first thought was a waterslide. Waterslides are fun. But a waterslide doesn't really fit the theme so instead I'll add some stairs. Stairs are less fun but probably easier to make. To double the fun we'll make two staircases.
The Foam is 2" high. I decided that the stairs will be 4" long. In almost all skirmish games I've played a miniature can move around 6" (give or take) So 4" I thought would be a good length so a miniature who started their move near the top or bottom could move all the way up or down and not need to stop in the middle. The stairs will be 2" wide, as that will accommodate most bases.
 |
| Cut out a 2" by 4" block of where the stairs are gonna be. |
 |
| My wife took this picture. She said I was 'adorable' playing with the new machine. By 'adorable,' she obviously meant HEROIC. Even wearing my Christmas PJs in July. |
MATH TIME: Math is not fun, though I'm told that certain types of people do find math fun. I've also been told that certain people find it fun to put together puzzles. I've even heard tales of some people who think it's fun to paint miniatures. These people are called boring. There's all types in the world.
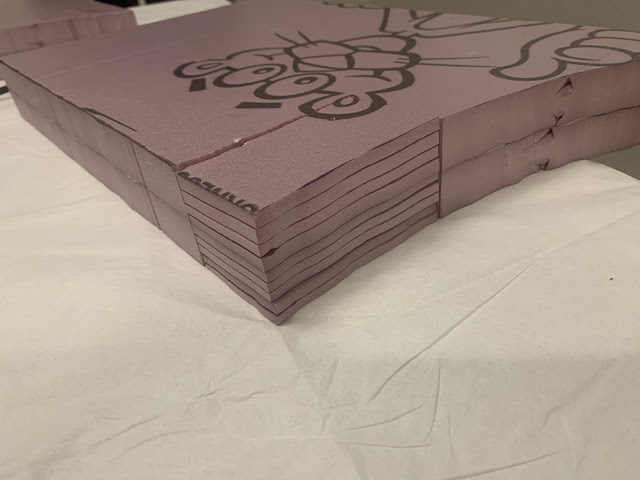
4" = 100mm. 10mm is a good size for a stair for a 28mm miniature, as it's just bigger than the foot.
Seriously, go look at one. I thought about this for a while, I spent time on this. Because stairs that are too big or too small would look out of scale and stupid. If each stair is 10mm long, then 10 stairs will fit into a 100mm length (10 into 100 is 10!). The height of the staircase is 2" = 50mm. If I want each of the 10 steps to be it's own layer, then the height of each stair should be 5mm (10 into 50 is 5).
Did that make sense? Course not. Math is hard and mysterious.
 |
then just take a layer and slice off 10mm increments to make stairs.
 |
| Like that. Stairs. How fun. |
 |
| We'll transform these into stone stairs by carving in a stone pattern. Now these are looking fun. |
Carving a stone pattern was super easy and there's a lot of youtubes about it if one is interested.
in summary:
1) use a sharp blade to slice in the outlines.
2) use a ballpoint pen or dull pencil to trace those lines to make them deeper / more distinct.
3) use a rock or ball of aluminum foil and smash it all over the foam to make a bumby rock like texture.
4) use a pair of tweezers to rip out small parts here and there to increase contrast.
Commit
With the stairs done, it was time to make a commitment and actually attach all this foam to the wood. Using liquid nails, I glued it all down trying my best to make sure the foam lined up with the edges of the terrain board and added foam scraps in any large gaps in the middle.
 |
| Tadaa! |
 |
| For this board, I'll declare the Foam stage: Complete. 2 more boards to go. |
I'm still deciding on what the next stage should be. Spackle to close the gaps? Add the wooden planks first? The ground texture? Move on to the next terrain board now that I've gotten down the basics of foam construction?
While wallowing in indecision I did the most boring thing a person could do and painted some miniatures.
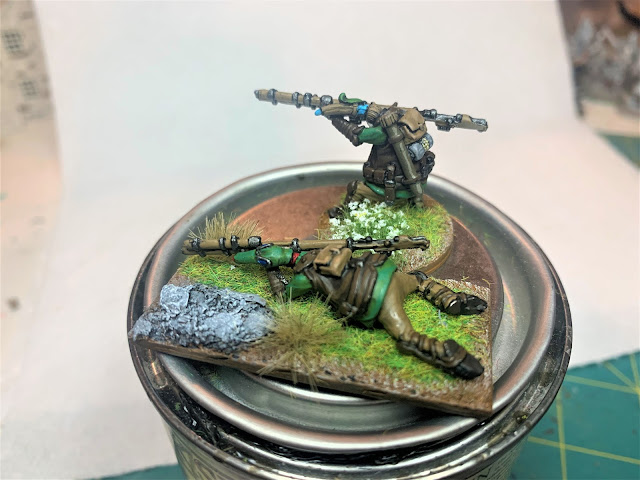
More Quar. What else is there?
 |
| These are Crusader Snipers. I always say sniper like this: sniPAH. It's more fun and amusing. |
Fun's Over
All fun times must come to an end. Usually that's when your children are born, but in this case, just the end of the post.
Thanks for reading
Double thanks for writing a comment.
Till Next time.


Excellent work Stew, I’ve never quite got round to building a trench system but perhaps one day I will join you having fun 👍
ReplyDeleteThanks Matt. I’m sure you can find lots of other ways to have fun besides trenches. 😀
DeleteNothing like having the right tool for the job, that wire cutter is excellent. I have the hand wand version which is very good except for when it comes to doing straight lines or sharp angles. The carving you’ve done for the stonework is also very effective. I really, really want a trench system. I know I could build one, my problem is where/how to store it without risking a marital breakdown.
ReplyDeleteThanks TP. I’m sure you could too. You’re much better at this stuff than I am. I might need to get a hand wand version as I seem to be getting all sorts of tools lately.
DeleteSemi lucky for me; my wife has SO much crap I mean stuff stored in the garage that I’ll have the morale high ground for storing these tiny terrain boards for a long time to come. 😀
A useful and entertaining DIY post. Wish I had seen it before I took a running start at steps for my jousting viewing platform (which I gave up on and just went without).
ReplyDeleteThanks Ed. I guess you could always add some stairs if motivation arises. 😀
DeleteThat is looking great, I didn't follow the maths regarding the stairs but they turned out perfectly so you clearly knew what you were up to (I tend just to eyeball things and not post my mistakes). One suggestion before adding spackle or other paints/texture/details to the surface; grab some very coarse sandpaper and lightly sand the foam surface, this will provide much better adhesion.
ReplyDeleteThanks Anton. Of course you didn’t follow the maths. Math is basically sorcery and I probably didn’t explain it well. 😝
DeleteThanks for the tip with the sand paper.
Great work on the stairs Stew and another great post.
ReplyDeleteWith content like this the internet may just catch on. 😁
The snipers are excellent as well.
Thanks Ben. There’s no telling with this internet thing is there?
DeleteI thought the sniPAHs came out pretty good as well. 😀
Fantastic work again sir!
ReplyDeleteThanks Michal. It’s a fun project. 😀
DeleteMaths is absolutely sorcery Stew - you’ve done very well indeed. Your projects are incredibly well thought out and inspiring. Makes we lazy blokes in the antipodes feel a bit embarrassed…but I’ll get over it 😂 . All the best mate - Carlo
ReplyDeleteThanks Carlo. Hope you are well. I had to look up Antipodes.
DeleteI’m sure you’ll get over any imagined embarrassment quickly. 😀
Some great progress Stewart, I would say the wood boarding needs to go on before Spackle or ground texture, as some of those bits on the wood would make it look bedded in, and you can always wip off any that ends up in a place you don't want it. When doing stone patterns I never use a a blade to mark out the stones, that's an extra step that's not needed, just go straight in with a pencil or pen, I use the blunt end of the sculpting tool.
ReplyDeleteThanks Dave. I’m thinking I’ll spackle first just to close up any gaps, then the wooden planks (gonna need to cut a pants load of planks first) and then the actual ground texture because as you say, if that gets on the wood in places it won’t really matter and could add to the effect.
DeleteI agree about the knife step: probably not needed. 😀
The steps look great Stew, and you seem to have mastered the cutting machine. The latest figures look great as well.
ReplyDeleteThanks Lawrence. It’s all coming along pretty well so far. 😀
DeleteI think spackle and then while still wet maybe put a few planks in to make them look a little deeper plus it'll help hold them in place.
ReplyDeletethanks SD. I'm thinking he same: spackle to close the gaps, and then wood, and then the actual ground cover. 😁
DeleteThis is turning out great, Stew! Math may be hard but you nailed the stairs’ proportions. Good looking Quar diversion too! It takes a brave man to pull off Christmas PJs in the scorching heat of summer.
ReplyDeleteThanks Jonathon. The Xmas PJs are just plain cotton, so not heavy. I just thought I looked ridiculous, and I think it's funny to put silly pictures of me on the internet. 😁
DeleteAlways great fun to read your posts Stew! Nice work on those stairs and how often do we over think simple things stair treads when we could be doing something else instead? As for working in your pyjamas and indoors, I would not wish to nor would I be allowed, as I have my own space in the garage to do this sort of thing. Plus I can't stand the smell of cut foam!
ReplyDeletethanks Steve. I know right? I even took a ruler and held it up to the feet of several miniatures to get an 'average size.' Very important tasks.
DeleteThe foam does give off a smell when cut.
The weekend is approaching and hopefully I'll find some time for the next board. 😁
Great looking miniatures you've clearly turned into a painting machine and good progress on your trenches I'm considering doing some myself so I may well steal some of your techniques!
ReplyDeleteBest Iain
Thanks Iain. It’s been a good streak.
DeleteIt’s not stealing; it’s sharing.
I’ve ’shared“ these techniques from others as well. 😀
Some great progress on the board! I'm not certain but using cutting tools with flowy pants like pajamas seems like it could be an OSHA violation! :) Also, I resent the comment about people who enjoy painting miniatures. I'm the life of the party or so I like to tell myself! ;)
ReplyDeleteThanks Jeff. I am the OSHA department in my house.
DeleteAnd you go on telling yourself whatever you like. We know the truth. 😝🤣
(I’m a kidder)
Really starting to take shape Stew...really like the steps.
ReplyDeleteThanks Mark. Long way to go still I think. 😁
DeleteLovely stairs!
ReplyDeleteAnd how kind of your wife to take pictures for you (also proof that the older two are gone, because you are hobbying early enough that she's still awake!)
Thanks David. And you understand my family’s dynamic and schedule very well. 😀
Delete