Tuesday, May 25, 2021

The Viking Shore Part 2 - The Shore


Hello All!  It's been awhile, I know I know I know.

I shall reward your patience with lots of pictures.  Every blog reader likes pictures.  

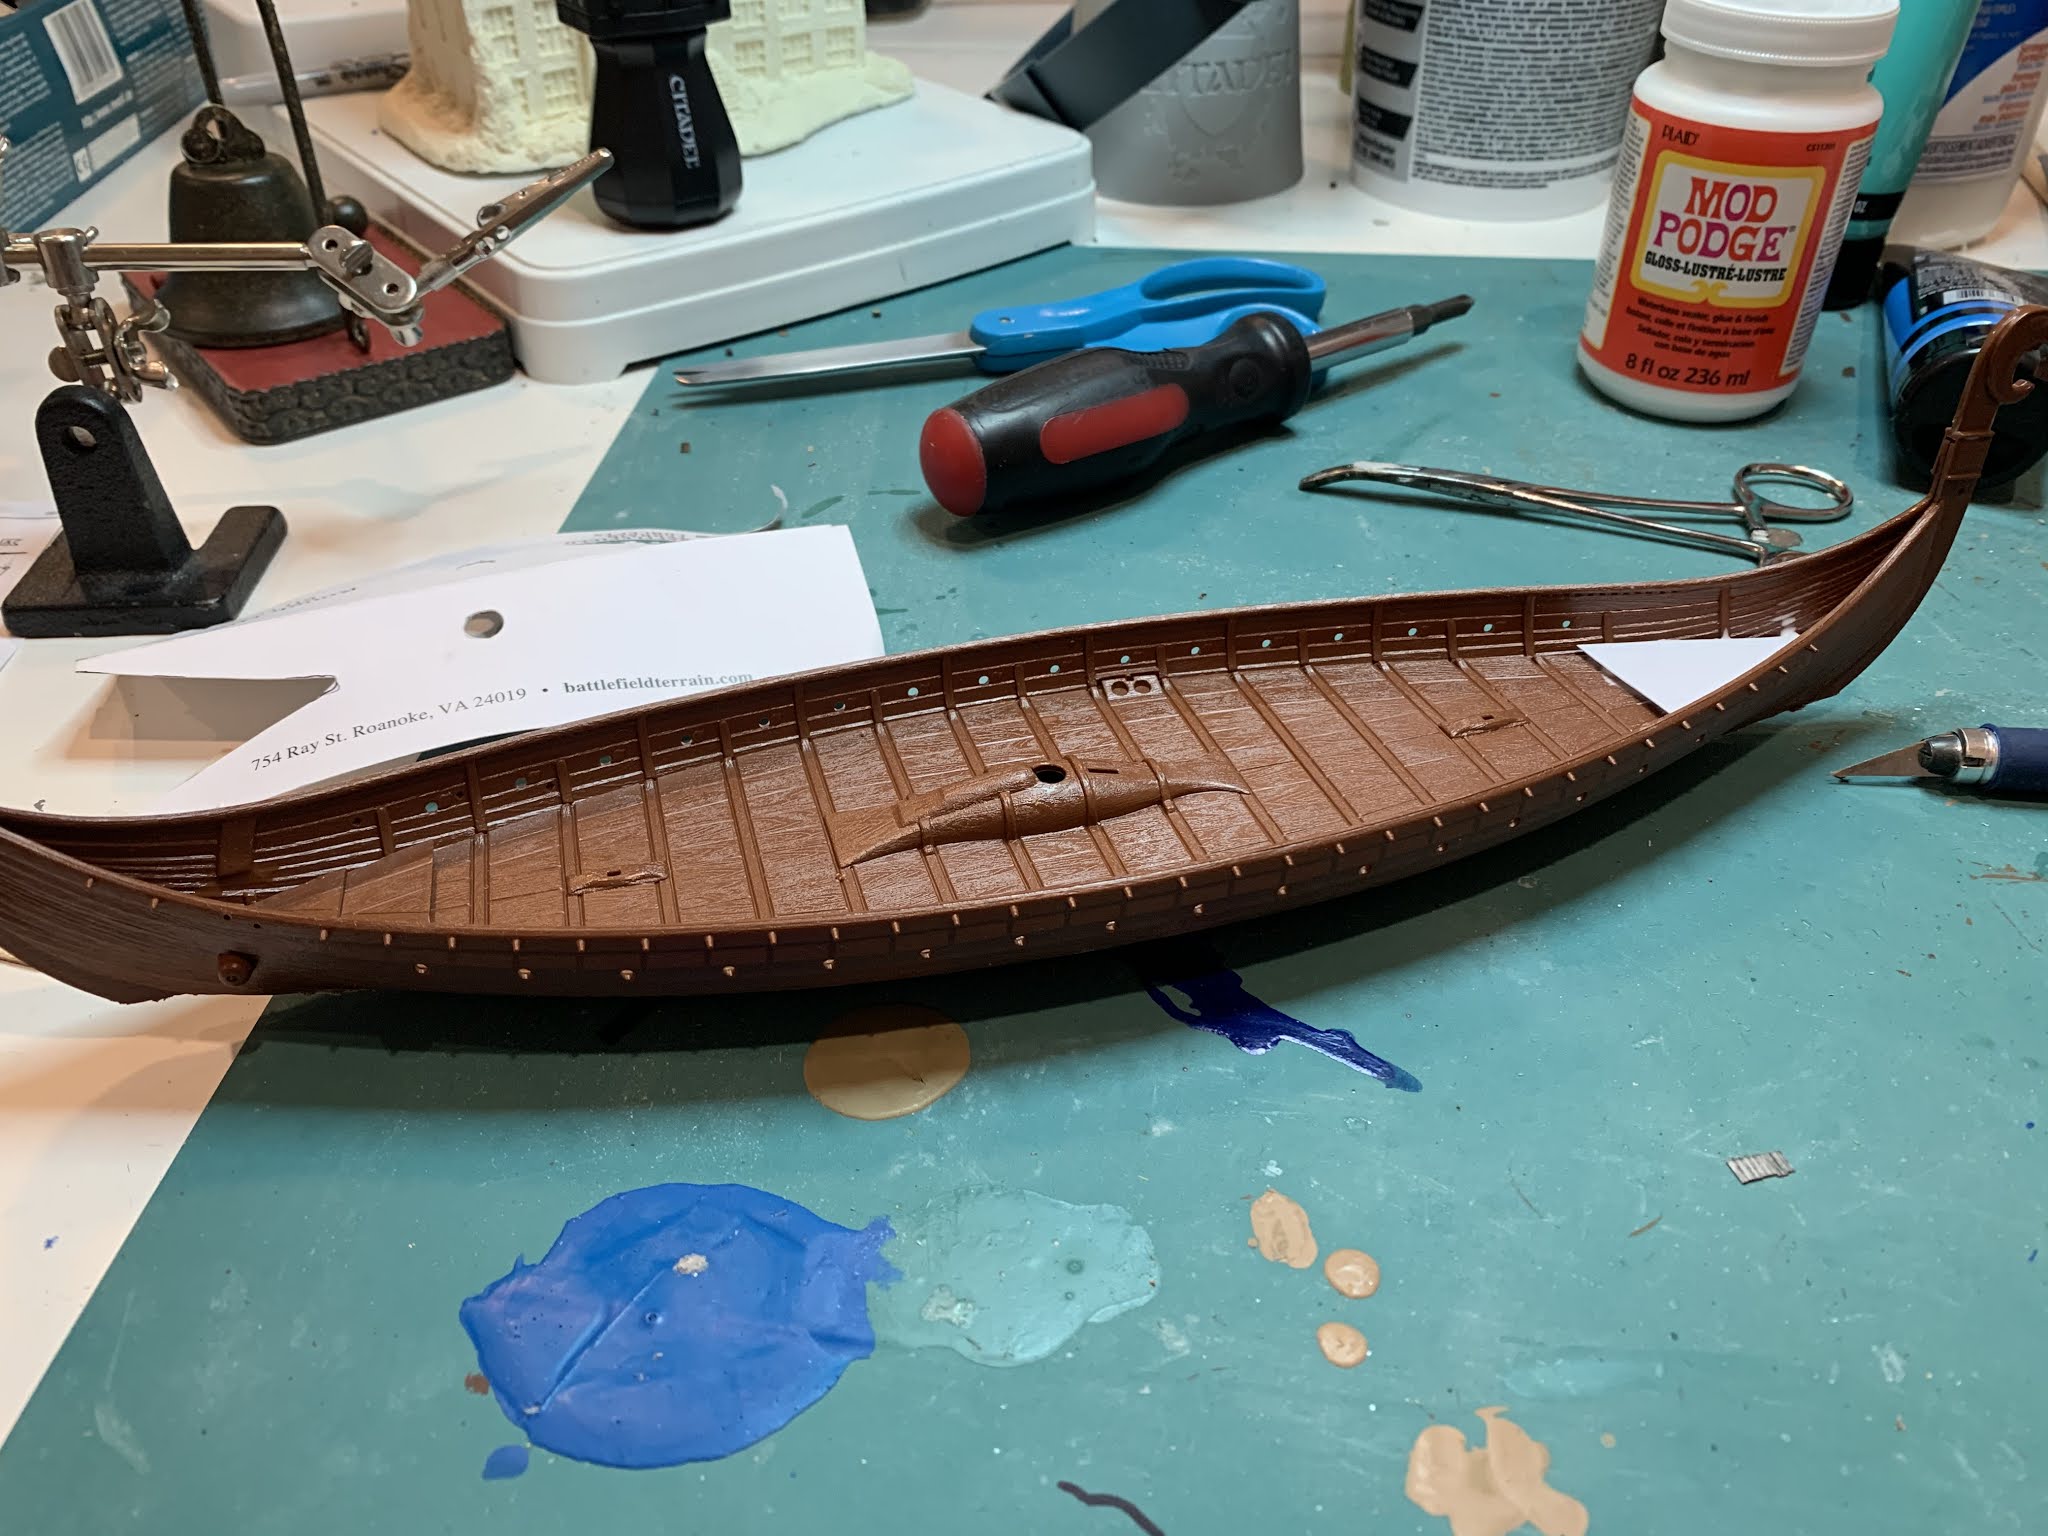
In the last post, I built a Viking Longship  and remarked that I had no coast or river bank to put it on.  So after all that work, the Vikings remained quite lame.  "We have a ship, I PROM-mise."  

In this post, I solve that problem by building some edge-of-the-waterfront terrain.  This was an ambitious project mainly for 2 reasons; 

1: I really don't know what I am doing; I just copy others off the internet.

2: Since my hobby time has been squished to the wee hours of the night and only one special nights, perhaps it was the wrong time to take on a large terrain project.  

But I do enjoy making terrain;  especially when it comes out looking half decent.  I suppose I could of posted WIP shots along the way instead of leaving the blog silent; but I wanted it all in one post for the sake of completeness.  Also, I had a really bad paper cut that prevented typing.  


Shore line terrain


I wasn't so much going for a beach but more for a the bank of some large navigable river.  I know I called this series of posts "The Viking Shore' and that implies a beach but I don't like the beach.  It's sandy, the water is freezing, the air is hot, and I sunburn easily.  

Where do trout keep their money? In the River Bank of course.  


I made two sections of River bank.
Each one is a little over 2 and half feet long, and around 9" deep.

I know rivers are more realistic if brown or gray colored.
But I life my water blue.  Blue like my dreams of the Caribbean;
Where the waters are warm and the beeches nude.

Lets see some close ups shaaaallll we?


I made two of these so that one can be used on a smaller skirmish table or both together on a larger table.

Both together on the 6' side of a 6'x4'.
There's enough room there for 2 Viking Lonships.
(Sing it now! To the tune of Moon River)
"Fooooore-shadow!  Hinting at what comes next.."

No Longer Lame Vikings


As mentioned, the WHOLE POINT of making the river bank is really just have a place for the Longship to sit on the table to attract Lady Viking groupies.  Let's see how that turned out:


kinda like that, But I can set the scene better.


"We're here.
Let's go steal stuff."


Construction pics of the River Bank


Here is a brief phot essay on the making of the terrain.  Notice that I stopped calling it shore and am now calling it a river bank.  That's called a transition.  It's what writers do.  


I took the last pieces of hardboard that I had lying around and cut them to shape
and beveled the edges.  Then I primed them black on both sides to prevent warping (I'm not sure if that really helps, it's just something I read about and in the habit of doing).
Then I cut some foam board to strips to make the rough shape of the bank.


Then I used wall spackle/filler to build up the bank to the foam board.
I added some undulations on top of the foamboard as well as
strategically placing some rock molds


River bank covered with ground texture.  Mainly fine ballast and coffee grounds.
Same thing I used on my forest terrain.
Also add small rocks around the larger rock outcropping.


After everything is dry, painted the bank as one does.
I thought painting the bank before I bothered with the water would be alright.


Construction pics of the Water 


Creating the water effects was a process I copied from the internet using toilet paper (we're not hoarding this stuff anymore right?  Pandemic is over right?).  If you type in 'toilet paper + glue = realistic ocean water" into google there is a nice man from Sweden named Marklin with an excellent video.  It's for his model railroad.  It's amazing what you can find on the internet and how smart people are.  I love the internet.  .

Anyways.....
Back to making wargaming terrain


If you care to watch the video, Marklin does a much better job of laying out the steps but start with..

put down a layer of glue only slightly watered down.


On top of the glue place strips of TP.  Go over it with a brush dipped in the gluey water.
Add layers as necessary to get good coverage.
I was going for just a wavy ripple effect versus an actual tide.
To get it, I used the brush to dab and push and basically just be fussy with the stuff
until I thought it looked right.


Here's how they looked when everything was dry.
I used an exacto knife to slice off any excess TP hanging off the edges.
You can see that in spots where the TP was thin that the black primer shows through.
That didn't happen to the Marklin!  I must of messed up.   
I was however pleased that the ripples in the TP were very solid.


Now it's time to paint the water.
This was a little nerve racking because I've never tried to paint water before.
Luckily, I was kinda super duper smart about it all:
(even a blind chicken will peck a kernel of corn once in awhile.)
using some cardboard, I had made a practice piece.
First I used to to practice putting on the TP (shown on left)
and now it would make good practice for the painting (on the right).


Paint the water using a wet blending method.
I had to look it up too.
I tried to make the water at the back of the piece look deeper by being darker.


Let the paint dry.
To get the glossy affect that water has, I coated the water sections
with gloss varnish.  A good idea stolen from the internet.


Looks like this when it dries.  Add more coats of varnish if necessary
though I found one coat sufficient.


Last step not pictured:  when everything is dry again - add flock to taste.
And there we have it.  I hope you found the process as exciting to read as it was to write.  
Maybe just mildly entertaining?

Plans are for Suckers


I was just thinking about how two months ago, I had zero plans about doing anything like this.  Wasn't even in my brain that I'd be embarking on creating a dark ages shore.  The whole project just kinda sprung out of nowhere.  I think it's one of the joys of our hobby that you can just go where the inclination / inspiration takes you.  It's a fun little hobby really.  Or is that's just an excuse for being distracted.  I waaaaas planning on doing some AWI stuff.  

Mooooovin'


'The Big Move' as I am now calling it; is progressing slowly.  We're much more in the phase where we are just trying to pack up stuff and put it in to storage than we are in the phase of looking for the next place to live.  We. Have. SO. MUCH. Stuff.  Least I get some exercise by moving the boxes.  I oughta have arms as big as tree trunks by the time this is over.

Thanks for reading.  Thanks for leaving a comment.  I appreciate it.  Won't be over a month till my next post.  PROM-mise.


Wednesday, April 21, 2021

The Viking Shore; Part 1 - Longship


Hello All,

In this post I build a 28mm (ish) Viking Longship.  All good Vikings need a longship.  Which means until now all my Vikings have been quite lame.


I'm stuck in the Dark Ages, but it's a good kind of stuck you know?  Like when something is stuck in your teeth but it tastes good.  

I wanted to expand my dark ages collection but did not want to paint miniatures.  Painting miniatures is boooooring.  Decided to do something different and build this ship that I've had lying around for a few months.  It took way longer to do than expected; due to my lack of time and poor modelling skills.  The object is not to have the ship sail around carrying miniatures but to sit on a coast looking like a really cool piece of terrain.  A little Dark Ages scenery magic that will get some oohhs and ahhs and a maybe few Viking lady groupies.  The I can say something sexy like "Let me show you my Longship..." 


Here is My Longship


Tadaa!


Bow

Stern


Whole ship

whole ship another angel


mast


Now for fun, let's put a miniature on the deck so we can get some sense of scale...


Standing in the Bow looking awesome

Stern


Middle


On the whole, I am quite pleased how it turn out, which is why I spammed you with pictures. 


Construction Notes (for those interested):


I used the same Revell Viking ship model that everyone has.  This model is 1:50 and 28mm is close to 1:56 so it near enough in scale to the miniatures to make no big difference.  

I got the model from a nice man on TMP
who basically let me have it for free.  I just paid the postage
and gave a promise that one day I would use it.
Promised fulfilled.


The ship comes in this ugly brown plastic but has everything needed to construct it.
One problem is that the model is designed to sit on a stand so has a keel
which will prevent it from laying flat on the game table.
It had to go.


To cut it down to closer to the waterline, I first glued to two halves of the hull together.
 Then I used a dremel with a cutting attachment to slice off the keel.
And a sanding attachment to further wear it down.

I didn't do the best job of it.
The plastic was melting as much as it was cutting off or being sanded away
and I was afraid I would end up destroying it..
  It now lays mostly flat, but wobbles to the right some.
I quit while I was ahead.


The model has an anchor well in the bow of the ship (read: big open space)
that I didn't like; how can someone stand in the bow and look awesome with no deck?
I constructed some deck planks over the anchor well with card from a cereal box.


Making the furled sail was a bit of challenge and I tried a couple ways.
The successful method was taking some toilet paper and soaking it in watered down glue,
enough that it became saturated but still held together (ie, not a lot of water/glue),
then folding it over and over on top of itself like layer cake.
Let dry on some wax paper.
Then used scissors to trim it down to the size of the yard. 
It kinda-sorta-almost looks like cloth that was gathered up in folds.


I glued the sail to the yard.
I took some lengths of  'rope' included in the box and coated them with glue
and then wrapped them around the yard and sail.
Looks alright.


Used the 'rope' to tie it to the mast.
I also took lengths of the rope covered with glue and wrapped around the mast
in strategic locations (where I thought rope would be).
I did the same on the Bow and Stern parts.  


I'm pretty sure that Vikings did not climb up the mast and then go out along the yard to loosen the sail like on Napoleonic era ships; but rather had the yard stored down the center of the boat and when it came time, just raised to yard into place.  I originally tried to have the yard and sail stored lengthwise along the ship but I couldn't get it to fit, so up high it went.  


Lastly was putting the decals on the shields, paint the shields some,
and putting the shields on the ship.
The decals are fiddley and didn't always work.
I had no intention of doing every shield that came in the box (64)
but just enough to give a good showing.  


Problems That I have Made Myself


Now that I am the proud owner of a Viking longship, I've come into some BIG problems.

1) I haven't quite figured out how to store the damn thing.

2) One longship does not a Viking fleet make; now I want one or two more.  This has lead to some internet shopping and comparisons.  Any suggestions are welcome before I buy something.  

3) The biggest issue is that I currently don't have any suitable river bank / beach terrain for the awesome model to sit on.  This must be solved immediately otherwise my Vikings will continue to be quite lame because there's nowhere to put it on the table.  My Vikings can saaay they have a ship but no one will see it, just like in high school I had a girl friend in Canada.  I'd like something where the ship could appear to be partly on shore and partly in the water; like they just pulled up to do some raiding.  

I freely admit that these aren't really-real problems.  


Now More Sporadic in Nature


I want to give a notice to those who are silly enough to waste their time by reading this blog regularly that updates will likely become more sporadic in the near future.  I have too many real world concerns that are coming to head and will require time and effort.  The biggest of which is I have to get serious about moving; unless I want son #3 (now 4 months old) to share my room forever.  

Till Next time.

Saturday, March 27, 2021

Ravenfeast: Escort the Priest Scenario and Review


Feeling Dark


Me: "Doctor, I just feel like it's coming back after a long time away."

Therapist: "What's coming back?"

Me: "I've just been feeling so Dark lately."

Therapist: "Uh-huh, and how long does this last?"

Me: "Oh, it lasts for Ages. What does it all mean?"

Therapist: "It means that it's time to blog about the Dark Ages on that silly little miniature wargame blog of yours."

Me: "oh, I can do that!  Sounds Great!  Thanks Doc!"

Therapist: "No problem.  Glad I could help.  That will be $500 for the session and I don't take insurance."

Me: "....."


Ravenfeast produced by Little Wars TV


I'm sure most of us are aware of Little Wars TV the youtube channel.  Lots of vicarious fun going on there and a great presentation of what a miniature wargame club could be like (My favorite guy is Keith).   They also do a nice job of promoting 'the hobby' and have put out a FREE set of wargaming rules for the Dark Ages called Ravenfeast.  Billed as a simple wargame aimed at beginners.  Very admirable and the group deserves a lot of praise and support.  It's the first entity that I've seriously thought about supporting on Patreon.  I haven't; I got a family to support and a small drug habit that needs feeding.  But I've thought about it.


I also thought to myself,  "I love the Dark Ages, and I love new rules, and I haven't played a miniature wargame in months, and I'm so bored lately, and I stubbed my toe, and my hair has split ends, I need to have some fun, so why not give the rules a try out?"  Yes, I tend to think in run on sentences.  


Escort the Priest to Victory


Ravenfeast comes with 3 scenarios and there are more online, but I still made up my own escort scenario just for fun-zees.  Here's an attempt at a dramatic backstory:

"King Alfred is moving his armies of Saxons against the Vikings lead by Guthrum.  A great battle will occur soon.  Several days journey from the armies a priest has a vision; If he carries the cross from his holy order of the Incredibly Nice Saint Augustus Nativity Ecclesiarch (or I.N.S.A.N.E) to the battlefield then God will surely grant victory over the heathen Vikings.  So he begins to walk without stopping and word travels ahead of his coming.  A Saxon Earl takes his men to provide an escort for safety and protection.  A Viking Jarl is dispatched to capture/kill/prevent the priest from fulfilling his quest and sets an ambush...."


Set Up: Use the exact same set up as the 'Back to the Boats' scenario in the rule book.

Forces: The Saxons are the Defenders and the Vikings are the Ambushers.  The Ambushers have about 200 more points than the Defenders (in hindsight I reduce this to 100 after playing it).  There are sample troops in the book which also provides the point structure so you can create your own unique profiles.  The forces I used were composed of:

That is 403 points of Saxons and 607 points of Vikings.


I used the open point structure to create the Viking Hirdmen Archer; basically a slightly better archer with some armor, because I HAD THE MODELS and they LOOK COOL.  

Distorted image but you get it....


Objectives: The Saxon Defenders must escort the Priest safely across the table.  The Viking Ambushers must stop that from happening. 

Victory:  The Saxons win a major victory if the Priest and at least one Earl or Earl's Champion exit the table (at which point they are somehow magically saved from further pursuit).  Minor Victory if only the Priest leaves the table.  Anything else and the Viking win.  Dirty Vikings. 

Special: Add to the Saxon force the Priest who has the following profile and special traits:
I made up 3 of those traits.
He has a 3" move because he is tired and carrying something heavy.


Game Pics from the Dining Room Table


RF uses a 4x4 table but I am lazy and didn't want to drag out the folding tables from the garage, so just used my dinner table which is around 3x3.  We'll get to the carnage faster that way.  


Table set up


Brave Saxon Defenders guard the Priest.
The Earl is the one with the fancy cloak and the raised sword.
All good leaders point their swords in the air.


Dirty Vikings block the road.
The Viking Jarl is wearing the fur cape.
He's also pointing his sword straight up, so he must be a great at this job.


Saxons (on right) move to block the force


Saxons (on left) use the waddle fence as an obstacle to defend
against the Viking flank attack from the other side.


Mid game


Saxons (foregroud) advance toward the Vikings blocking the road


Shieldwalls form and clash together


General Mayhem as the fight breaks down to individual engagements.
The Vikings are able to start attacking the Priest.  


Oh no, the Viking Jarl and some nameless Bondi
are ganging up on the Priest, there are just not enough Saxons to prevent the attacks.


For awhile there it looks like the Saxons are winning.
Viking dead on the left, Saxons on the right


At this point I had to take a break in game due to the Great Interrupter (otherwise known the baby boy) needing a diaper change, a bottle, and 30 minutes of rocking before going back to sleep.  

When I got back, I played two more turns and the Vikings killed the Priest mainly because the Saxons did not have enough men to block each Viking.  


Rules Review?


You don't really need a rule review for Ravenfeast.  The purchase of rule reviews is to give more information so that folks can decide to buy a set of rules or not, and these are free so no need for that! 

Though here are some observations from my game play:

The rules are really well produced.  These look sooo professional and better than some rules that I've paid for. 
The rules do exactly as intended; it's a simple fun rule set.  Us veteran wargamers might find them a little too simplistic (because we're all tactical geniuses right?!)  And there are some nice general hobby encouragement pieces.  It's very well written as well.  

Other observations:
Miniatures are stuck in combat unless they do a disengage move which grants a free attack with no save, which seems strange to me.    I had several models that were stuck in place for several turns because no one could win a fight.  

For example:
The Viking Champion and Saxon Earl shown above were stuck in combat
basically the whole game just trading blows.


Morale tests happen at the end of a turn, and the rules are a little unclear if miniatures who are stuck in combat should take them.  Or maybe I'm just used to LOTR where miniatures are who are fighting are too busy to take morale tests.  I played it that models DID take morale tests and if they failed made a disengage move. 

Rules don't say if a shield wall could be formed in rough terrain (Shield walls move at half speed and rough terrain is also have speed so would a shield wall in rough terrain be half half? I just played no shield walls in rough terrain.

The rules do mention that if a miniature is attacking over an obstacle it takes a negative modifier to it's melee stat.  This did come up in my game.  But it's unclear what happens when the miniatures get stuck in combat like I was describing.  Is one still considered the attacker?  When the Vikings charged the Saxons defending the fence, I gave the Vikings the negative; but if two models continued to fight over the fence I gave them both the negative.   


Overall though, I had a nice evening messing about with my dark ages stuff.  Scratched an itche if you know what I mean.  Till next time.