What’s an ACW battlefield without a cornfield or
two? I’ll tell you what it
is….BORING!
Actually, one day I’m going to do some wargaming around
one of my favorite ACW battles, the battle of Antietam. The battle voted most likely to be
mispronounced. So naturally I would need
a cornfield.
This is one of those situation where one is trying to
balance 3 things; aesthetics, playability, and budget.
You can spend a lot of money for really nice corn, but to
get a field of any decent size this starts to become really expensive.
So looking around the internet for ideas, I found that
people were using Christmas pine stems for their cornfields, so I decided to
give it a try. Here is a tutorial; which
is simply the way that I did it copied from others. I’m not sure who did it first, but that
person had an ah-Maize- ing idea. Ok,
I’m sorry for that corny joke. Oh man,
they just keep coming.
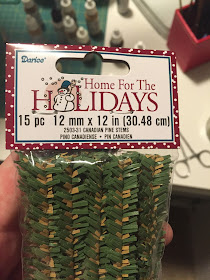
Step 1! Buy some
pine stems. I got these off of
Ebay. I found some in two sizes, 15mm
and 12mm. I think the 12mm looks better
for my 18mm ACW figures. You will need
LOTS. I like these ones shown here as
they have green and brown in them.
Step2! Take some
wire cutters (scissors won’t do as the center of the stem is made of wire) and
cut the stems to the length desire. I
went with about an inch but I also varied it some to create…variance… in the
corn stalks (didn’t want them to be too uniform height). You will need to do this LOTS. It is most tedious. Also, you will get the little pieces of
plastic fletching falling off making a small mess.
And if you’re like me and have delicate little girl hands,
this can start to hurt after doing it a hundred times.
Step3! Prepare the
bases! Now this is the place where I
diverted from others and put my own spin on the process. Most people do this on square bases because,
you know, the fields are square. However
I went with round bases as I am an original thinker and dare to be
different.
Actually, I went with round bases as I thought it would
be easier to model irregular shaped fields.
I also think that it’s easier / looks better that when troops move
through the fields to place the batches of corn stands around the troops. Troops on square bases moving in square based
corn stands just look a little too artificial, like the troops have to move in
just the right way, basically at 90 degrees.
I used 50mm circles bought from Litko, the same 3mm
thickness as my ACW bases.
I was also persuaded to skip the step of adding ground
texture to the bases, as it would be extra work for little payoff. I dunno about that in hindsight but too late
now.
To break down step 3 into smaller steps;
3a! Cover in
ground texture or not…
3b! Create a
pattern of where you want the corn “stalks” to be. Even back in those ACW days corn was planted
in rows, lay out how many rows you want per base depending on how thick you
want it to be. Because of the circle
base I went with a 3-4-4-3 pattern.
That’s 14 stalks per base (see above comment about needing LOTS of
stalks). I cut out a piece of cereal
box in a 50mm shape, and cut the holes in it, and then used a Sharpe pen to
mark the holes in the wood.
3c! odds are, if
you are bothering to read this, you are a MAN-ly wargamer. So get
thee to your manly tool area for your power drill (do you remember that TV show
with Tim Allen with all the power tools, that was funny), and skillfully drill all the holes. Just drill all the way through the wood. Naturally use a small bit.
3d! Paint the bases.
Award yourself 5 extra ‘awesome wargamer’ points if the color you use
compliments the material that you’ll use to outline the borders of the
field.
For example, I am using the Lemax Moss matt, that you can
get right now at Michaels, actually.
This is the thing they use to base those cute Halloween villages. I just like the way it looks on the wargame
mat.
I used spray paint, and had to try a few different colors
before settling on Nutmeg.
 |
| Nutmeg is the 3rd up |
Step4! Plant corn.
Feel free to listen to a banjo or country music or something while doing
this if you think it’ll improve the experience.
To plant the stalk, just pull off some of the lower ‘leaves,’ dip in
glue, and stick in the hole in the wood.
There’s likely a dirty joke in that sentence somewhere.
TAAADAAA repeat
process a couple of hundred times…
So the assemble the cornfield, you cut the field material
into the shape you want, and cover it with cornstalk bases until it starts to
look like a field. Add fences and what
have you….


Looks pretty good! Maybe you could do a couple of bases of trodden down drying stalks too, just to mix it up a bit.
ReplyDeleteThanks Lasgunpacker. That's a good idea. 😀
DeleteWay cheaper than my idea of picking up those model railway efforts....
ReplyDeleteSo many puns. You should be ashamed.
I still need to do several more of these actually.
ReplyDeleteI thought the puns were the best part of this post!
Good idea, may have to steal.
ReplyDeleteGood idea, may have to steal.
ReplyDeleteSteal away! After all, that’s what I did!
Delete